what is smart account and safe

overview

Safe provide a sdk to create a smart contract account which is a fully customizable acocunt.
In crypto if you give away your private key,your money is gone.You can’t take them back.Smarct account is built to prevent those.
Common usecase:

  • multiple-signer(2 or more)
  • set spending limit(e.g. $100 perday)

Smart Account vs Signing Accounts(EOA)
Difference between two type of accounts
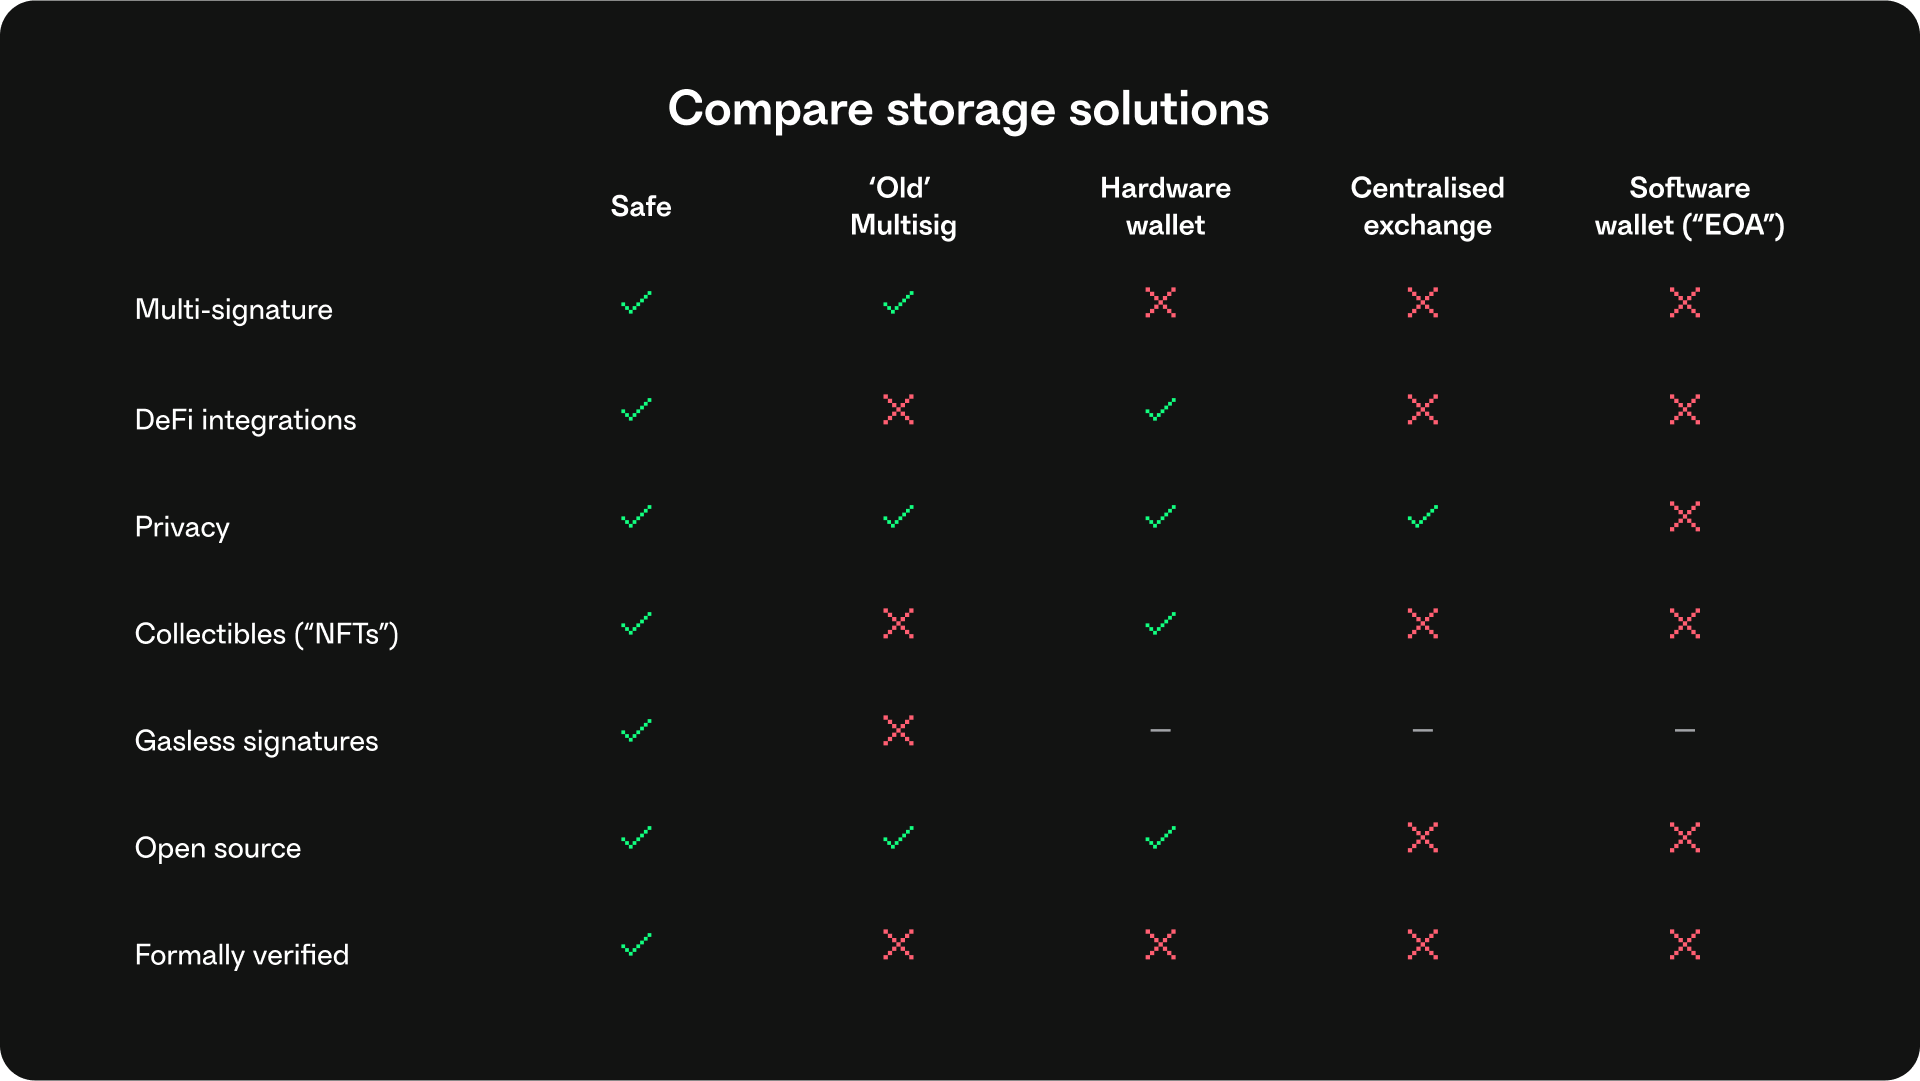
"smart account"

safe {core}

safe {core} consist of 3 parts.

safe {core} AA SDK

Interact with your application directly.

safe {core} API

Provide safe account related information.

safe {core} protocol

Smart contract account standard and programmable.

Safe AA SDK

protocol kit

1.Install Dependencies

1
2
3
4
5
yarn add ethers@5.7.2 @safe-global/safe-core-sdk \
@safe-global/safe-core-sdk-types \
@safe-global/safe-service-client \
@safe-global/safe-ethers-lib \
dotenv

2.Create .env config file

1
2
3
4
touch .env
export OWNER_1_PRIVATE_KEY='<PRIVATE_KEY>'
export OWNER_2_PRIVATE_KEY='<PRIVATE_KEY>'
export OWNER_3_PRIVATE_KEY='<PRIVATE_KEY>'

3.Init

1
2
3
4
5
6
7
8
9
10
11
12
13
14
15
16
import { ethers } from 'ethers'
import EthersAdapter from '@safe-global/safe-ethers-lib'

// https://chainlist.org/?search=goerli&testnets=true
const RPC_URL='https://eth-goerli.public.blastapi.io'
const provider = new ethers.providers.JsonRpcProvider(RPC_URL)

// Initialize signers
const owner1Signer = new ethers.Wallet(process.env.OWNER_1_PRIVATE_KEY!, provider)
const owner2Signer = new ethers.Wallet(process.env.OWNER_2_PRIVATE_KEY!, provider)
const owner3Signer = new ethers.Wallet(process.env.OWNER_3_PRIVATE_KEY!, provider)

const ethAdapterOwner1 = new EthersAdapter({
ethers,
signerOrProvider: owner1Signer
})

4.Deploy your safe

1
2
3
4
5
6
7
8
9
10
11
12
13
14
15
16
17
18
19
20
21
import { SafeAccountConfig } from "@safe-global/safe-core-sdk";

const safeAccountConfig: SafeAccountConfig = {
owners: [
await owner1Signer.getAddress(),
await owner2Signer.getAddress(),
await owner3Signer.getAddress(),
],
threshold: 2,
// ... (Optional params)
};

/* This Safe is tied to owner 1 because the factory was initialized with
an adapter that had owner 1 as the signer. */
const safeSdkOwner1 = await safeFactory.deploySafe({ safeAccountConfig });

const safeAddress = safeSdkOwner1.getAddress();

console.log("Your Safe has been deployed:");
console.log(`https://goerli.etherscan.io/address/${safeAddress}`);
console.log(`https://app.safe.global/gor:${safeAddress}`);

auth Kit

The Auth kit creates an Ethereum address and authenticates a blockchain account using an email address, social media account, or traditional crypto wallets like Metamask.

1
2
3
4
5
6
7
8
9
10
11
12
13
14
15
16
await safeAuthKit.signIn();
await safeAuthKit.signOut();
safeAuthKit.getProvider();
safeAuthKit.subscribe(SafeAuthEvents.SIGN_IN, () => {
console.log("User is authenticated");
});

safeAuthKit.subscribe(SafeAuthEvents.SIGN_OUT, () => {
console.log("User is not authenticated");
});

const safeAuthKit = await SafeAuthKit.init(SafeAuthProviderType.Web3Auth, {
...
txServiceUrl: 'https://safe-transaction-goerli.safe.global' // Add the corresponding transaction service url depending on the network. Other networks: https://docs.gnosis-safe.io/learn/infrastructure/available-services#safe-transaction-service
authProviderConfig: { ... }
})

relay kit

The Relay Kit allows users to pay transaction fees (gas fees) using the native blockchain token or ERC-20 tokens. This allows you to pay gas fees using any ERC-20 token in your Safe, even if you don’t have ETH.

1
yarn add @safe-global/relay-kit
1
2
3
4
5
6
7
8
9
import { GelatoRelayAdapter } from "@safe-global/relay-kit";

const relayAdapter = new GelatoRelayAdapter();

relayAdapter.relayTransaction({
target: "0x...", // the Safe address
encodedTransaction: "0x...", // Encoded Safe transaction data
chainId: 5,
});
1
2
3
4
5
6
7
8
9
10
11
12
13
14
15
16
import {
GelatoRelayAdapter,
MetaTransactionOptions,
} from "@safe-global/relay-kit";

const relayAdapter = new GelatoRelayAdapter(GELATO_RELAY_API_KEY);

const options: MetaTransactionOptions = {
isSponsored: true, // This parameter is mandatory to use the 1Balance method
};
relayAdapter.relayTransaction({
target: "0x...", // the Safe address
encodedTransaction: "0x...", // Encoded Safe transaction data
chainId: 5,
options,
});

onramp kit

This package is provided for testing purposes only

Safe API

Network Host
Ethereum Mainnet https://safe-transaction-mainnet.safe.global
Goerli https://safe-transaction-goerli.safe.global

Safe Protocol

Modules

Modules are smart contracts that add custom features to Safe contracts. They separate module logic from the Safe’s core contract, and are added or removed with confirmation from all owners. Modules are critical for security and emit events when added, removed, or when module transactions succeed or fail. There are many types of modules, including daily spending allowances, recurring transactions, standing orders, and social recovery modules, which can help you recover a Safe if you lose access to owner accounts. Modules can be used in various ways to enhance your Safe’s functionality.

Guards

Transaction guards can make checks before and after a Safe transaction.

how to write a hackathon readme

overview

A hackathon is an event where developers, designers, and other tech enthusiasts come together to collaborate on a project. At the end of the event, all teams present their projects to a panel of judges. A hackathon readme document is a crucial part of presenting your project. It provides details about your project, how to use it, and how to contribute to it. In this blog post, we will discuss how to write a hackathon readme document that will help you present your project effectively.

why we need a readme document

The purpose of writing a README document is to provide information about a project or software. It should include instructions on how to install and use the software, as well as any dependencies or requirements. The document should also provide an overview of the project and its goals, as well as any relevant background information. Additionally, it should cover any edge cases or potential issues that users might encounter, and provide instructions on how to address them. Finally, it should include information on how to contribute to the project, as well as any testing or quality assurance protocols that are in place.

what should be included in readme document

After the entire project is finished,we should deploy it on the server. Thus hackathon judgers can review our project by click the link.Additionally we should upload a video about how to use it to youtube.Here is the example:

directory tree

Directory tree gives a quick view of our whole project.Hakcathon judgers can quickly find what they want from the directory tree.And it is quite easy to generate the directory tree by using linux command:

tree -L {max-depth}

Here goes the output of this command
"tree"

flowchart

A project flowchart is a visual representation of the sequence of steps in a project. It helps in identifying process inefficiencies, improving communication, and ensuring everyone involved in the project is on the same page.I recommend to use “miro” to draw a flowchart. Miro is the online collaborative whiteboard platform that enables distributed teams to work effectively together, from brainstorming with digital sticky notes to planning and managing agile workflows.
Here goes a example generate with miro:
"flowchart"

install

The install command is depends on the teck stack you use.Let us say you building with react and node.We have to install all dependencies before we run the server.

1
2
npm install
npm run dev

api document

API stands for Application Programming Interface. It is a set of protocols, routines, and tools for building software and applications. Documentation is an essential part of the development process because it enables developers to understand the functionality of the API.

tech stack

When it comes to building a software project, one of the most important decisions you’ll make is choosing the right tech stack. A tech stack is the combination of technologies and programming languages used to build a software application. It’s important to choose the right tech stack because it can affect the performance, scalability, and maintainability of your project.We can also list the teck stack in our readme document like this:

  • next.js
  • tailwindcss
  • solidity
  • uniswap v3 protocol

reference

References are important for several reasons. First, they provide evidence to support your arguments, which adds credibility to your work. Second, references allow readers to verify the information you have presented. Third, references demonstrate that you have done your research and are knowledgeable about your topic. Finally, they show that you are giving credit to the original authors for their ideas and work.

license

A code license is a legal agreement that outlines the terms and conditions for the use, distribution, and modification of a piece of code.
SPDX short identifier: MIT

what-is-concordium

concordium

概览

Concordium 区块链是由科学支持的合规性区块链,可实现私人和公共交易。
它提供高吞吐量、快速交易和可预测的费用,允许企业、开发商和贸易商利用区块链的真正力量和潜力。在您开始使用 Concordium 区块链之前,最好了解一些关于我们独特的区块链的基本概念

身份

关于身份

账号和身份在 Concordium 平台上紧密关联。为了能够持有、发送、接收 CCD 或者成为 Concordium 平台上的 baker,你必须要有一个账号和身份。这和你是否使用 Concordium 硬件钱包,还是安卓钱包,还是桌面客户端亦无关。
在你开始使用 Concordium 平台之前,身份验证者需要验证你在真实世界的身份信息。这个验证操作在你创建账号的时候进行。
身份由身份验证者提供。目前已经有注册了一些身份验证者并且他们的联系方式都是公开在平台区块链上的。平台基金会持续维护这份名单。

身份属性

每个身份信息包含了一些加密值,和一些用户选择的属性,例如国籍或者居住的国家。这些信息由身份验证者认证。这些加密值由公钥和私钥,身份验证者的签名,还有一些创建账号所需的秘钥值所组成的。
你可以控制哪些属性可以对外公开。你也可以选择完全不透露任何信息保持匿名,这种方式比较推荐。

获得身份

你选择可以在桌面钱包、硬件钱包、安卓客户端、网页钱包中的其中一种来创建你的身份。身份创建是一个链下的操作。如果你在移动设备上创建你的身份,我们强烈推荐你使用安卓客户端。
alt ""

账号

关于账号

Concordium 上的账号属于一个或者多个凭证持有者。一个账号由链上和链下两部分组成。

链上:

  • 凭证
  • 公开余额
  • 隐藏余额
  • 账号序列号
  • 公钥

链下:

  • 私钥

  • 创建账号的身份

  • 解密秘钥用于私密转账
    Concordium 提供了多种和链上账号交互的方式。线下部分的账号可以在不用的设备之间转账。同一个账号可以在不同的设备中同时使用。链上的账号通过账户地址 32-bytes 标识。eg:3ZFGxLtnUUSJGW2WqjMh1DDjxyq5rnytCwkSqxFTpsWSFdQnNn

    在某些情况下你可能需要对外暴露你的国籍,由于用户可以关联多个账号,某些账号暴露了国籍信息,其它账号匿名了国籍信息,当你需要的时候你可以使用这个暴露了国籍信息的账号,并且让其它的账号保持匿名。如图所示:
    alt ""

钱包

Concordium 有各种平台的钱包

  • Web 插件钱包
  • 安卓客户端钱包
  • 硬件钱包

为了使用方便我这边选择了 web 端的浏览器插件钱包

alt "wallet")

在测试网创建一个身份
alt "wallet2"

在创建了身份之后,我们可以通过身份去创建账号。
alt "account"

使用 ID

Concordium 的浏览器钱包提供了一些证明,当用户遇到需要一些认证的场景时,列如证明用户的年龄是否达到一定年龄时,或者用户地区的一些认证。这个钱包的所有者这个时候可以选择是否像应用提供这些信息。应用会构建一个声明列表,以请求对应的属性的零知识证明列表,而不会透露声明的真实内容。

alt "use id"

对于 dapp 在使用这些证明的时候需要遵守一些规则。

  • 对使用的属性的数量上市没有限制的。
  • 一个属性一次只能用于一个证明

可以显示的属性有:

  • First name
  • Last name
  • Sex
  • Date of birth
  • Country of residence
  • Country of nationality
  • ID document type
  • ID document number
  • ID document issuer
  • ID valid from
  • ID valid to
  • National ID number
  • Tax ID number

要求用户暴露属性的格式

1
2
3
4
5
6
[
{
"type": "RevealAttribute",
"attributeTag": "countryOfResidence"
}
]

范围证明的格式

1
2
3
4
5
6
7
8
9
10
11
{
"challenge": "a54bc4116655d247fa625d98f768d4d81e55ffe26ac6bab259bad5895d49ae00",
"statement": [
{
"type": "AttributeInRange",
"attributeTag": "dob",
"lower": "19571212",
"upper": "19971212"
}
]
}

证明是否包含在成员中

1
2
3
4
5
6
7
8
9
10
{
"challenge": "6c7d69b121d4ce829392d9f2b16395708a458f6183caa20e9074e7283e377418",
"statement": [
{
"type": "AttributeInSet",
"attributeTag": "nationality",
"set": ["DK", "FI", "IS", "NO", "SE"]
}
]
}

资源

How to quick start web3.storage

register an account

  • Email
  • Github (recommand)

install the client

1
2
3
4
javascript
npm install web3.storage
golang
go get github.com/web3-storage/go-w3s-client

create a client instance

1
2
3
4
5
6
7
8
//get the access token
function getAccessToken(){
return process.env.TOKEN
}
//creata an instance
function makeStorageClient(){
return new Web3storage({token:getAccessToken()})
}

preparing files for uploading

1
2
3
4
function getFiles(){
const fileInput = document.querySelector('input[type="file"]')
return fileInput.files
}

upload files to web3.storage

1
2
3
4
5
6
//async upload process
async function storageFiles(files){
const client = makeStorageClient()
const cid = await client.put(files)
return cid
}

directory wrapping

after uploading you’ll get a cid of the directory and then the entire link gonna be ipfs:///
to make a gateway link :

1
2
https://<cid>.ipfs.<gateway-host>/<filename>
https://<gateway-host>/ipfs/<cid>/<filename>

storing ipfs content archives?

if you already have some files you can use putCar client function.I don’t want to jump into this here.

how to access data we uploaded above ?

  • using an IPFS http gateway
  • using client library
  • ipfs command line
  • system command line

how to query web3.storage

1
2
3
4
async function checkStatus(cid){
const client = xxxx
const status = await client.status(cid)
}

return data structure

  • cid
  • created
  • dagSize
  • pins
  • deals

how to list files uploaded to web3.storage

1
2
3
4
const client = xxxx
for await (const upload of client.list(){
console.log(upload.name,upload.cid,upload.dagSize)
})

listing the content of an IPFS directory

How to write a reserve plugin part 2

Contructor params of a collateral contract

  • fallbackPrice
  • chainlinkFeed
  • ERC20+rewardERC20
  • maxTradeVolume
  • oracleTimeout
  • targetName
  • delayUnitDefault

What’s fallbackPrice?

fallback price is when we try to get the real price but revert then we provide a fallback price.
fallback price is return when function price(bool allowFallback) is called and the param past in is true.
In the price() function we’ll call strictPrice() function first once it revert we’ll check if the value of allowFallback is true. If false return value is (isFallback-bool,fallbackPrice)
the unit of fallback price if {UoA}

What’s chainlinkFeed ?

Firstly ,it’s been created by chainlink.The interface allows your contract run functions on that deployed aggregator contract. For example ,you can use chainlink data feed to connect your smart contract to asset pricing data like the ETH/USD feed.
the unit of feed is {UoA/tok}

What’s ERC20 ?

this is import from openzeppein/contracts/token/ERC20/extensions/IERC20Metadata.sql
IERC20Metadata is inherit IERC20
some function like transfer,totalSuoply,balanceOf,approve,transferFrom all we need to create an ERC20 token.

What’s max trade volume?

the unit of max trade price if {UoA}

What’s oracle timeout?

the number of seconds until a oracle value becomes invalid.Otherwise we have to change the collateral status by calling markStatus().

What’s target name?

the canonical name of this collateral’s target unit.

What’s delayUnitDefault?

the number of seconds an oracle can mulfunction.
this value is used when we call markStatus() function.
when collateral status is “IFFY” . smart contract compare blocktime+delayUnitDfault and _whenDefault and then return the min(Math.min) one?

Reserve protocol introduce

All you need to know for writing a reserve protocol collateral plugins quick start

core plugin depends on two plugin types:

  • Assets / Collateral (contracts/plugins/assets)
  • Trading (contract/plugins/trading) not discussed here

Collateral is erc20 token + below:

  • if ERC20 back ?
  • refresh()
  • status() SOUND/IFFY/DISABLED
  • rate exchange

Monetary units

  • Unit of Account
  • Target unit
    RToken maintaining stability or appreciation against its target unit
  • Reference unit

e.g. of 3 different tokens

  • Collateral : cUSDC
  • Refence : USDC
  • Target : USD

Units definition

  • {UoA} unit of account recommand USD here
  • {tok} whole token
  • {ref} whole reference token
  • {target} whole target unit
  • {ref/tok} refPerTok()
  • {target/ref} targetPerRef()
  • {UoA/target} pricePerTarget()

Basket definition

  • Prime basket
    this is set by governance , on changes through successful governance proposals. it consists of an array of triples
    <collateral token,target unit,tartget amount>
    e.g. : <cUSDC,USD,0.1>
  • Reference basket
    <collateral token,reference unit,reference amount>
    e.g. : <aDAI,DAI,0.33>
  • Collateral bascket
    <collateral token,token amount>
    e.g.: <cUSDC,0.29>

IAsset interface

alt "interface"

Accounting units

before we create a collateral plugin we have to choose 3 accounting units

Collateral unit

its just erc20 token

Reference unit

to be ask , what’s a unit that this collateral token will always be worth the same value or more of .

Target unit

target unit has to do with a concept called the target basket. what’s prime basket ?
A example of linear combination of target units:

  • 1 USD
  • 0.5 USD + 0.55 EURO
  • 0.5 USD + 0.35 EURO + 0.00001BTC

Unit of account

we can assume UoA == USD , because for now USD price are king.

Important properties for collateral plugins

Collateral plugins should be permisionless and should be able to used by any number if RTokens
Token balance can’t be rebasing

refresh() should never be revert

refresh is been called before any transactions , it return exchange rates.
if occur an important error , refresh should change the state to DISABLED

strictPrice() price(bool) status()

the IFFY status should be temporary

Collateral must default if refPerTok() falls

Defaulted Collateral must stay defaulted

if status() ever returns disabled , then it must always return disabled in the nearly future

Token rewards should be claimable

  • rewardERC20()
  • getClaimCalldata()

Smaller Constraints

The value of the following methods should never change:

  • isColleteral()
  • targetName()
  • erc20()
  • rewardERC20()
  • erc20Deciamls()

Function-by-function walkthrough

  • strictPrice() {UoA/tok}
  • price(bool) {UoA/tok}
    if revert depends on the bool value true or false
  • refPerTok() {ref/tok}
  • targetPerRef() {target/ref}
  • pricePerTarget(){UoA/tartget}